Table of Contents
Adding Students and Staff
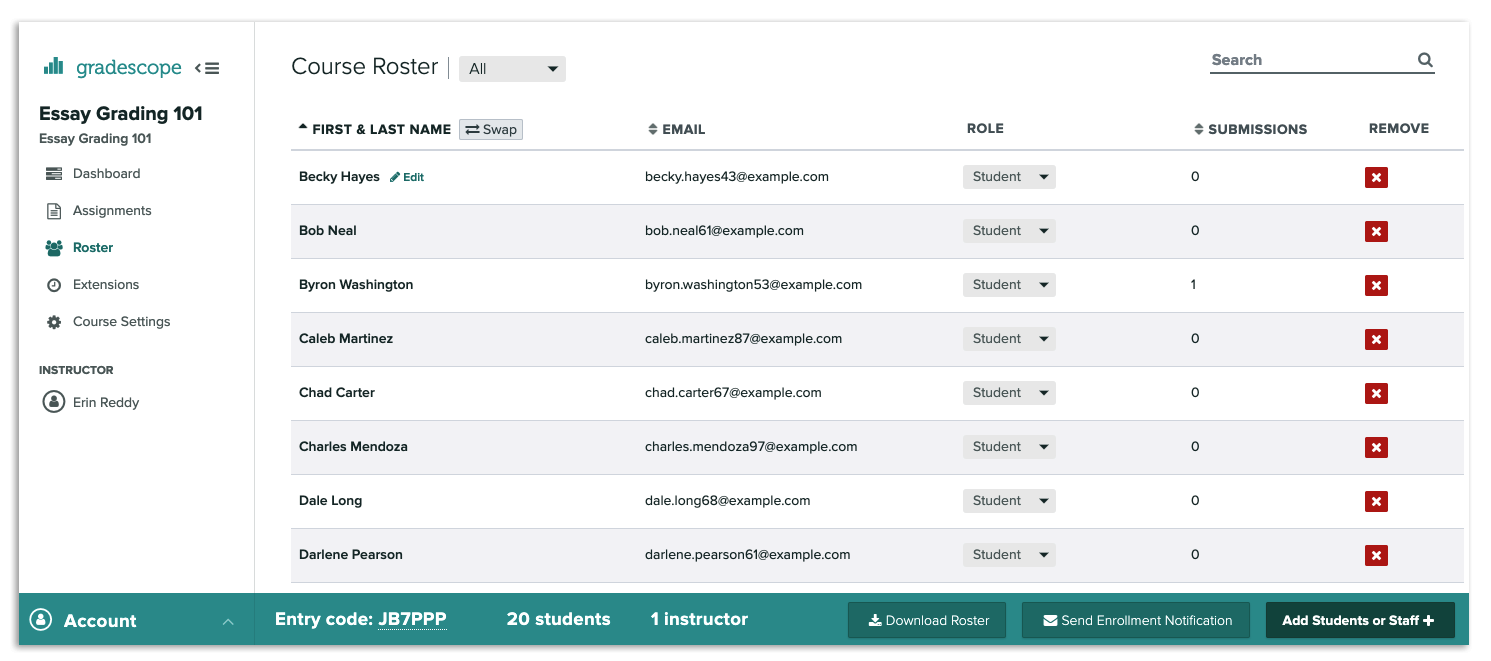
The course roster is necessary to match students to submissions, manage course staff permissions, and allow students to see their work on Gradescope.
Staff roles and permissions
Gradescope has three staff roles: Instructors, TAs, and Readers. The TA and Reader roles share the same permissions in Gradescope, so you can choose to designate someone either as a TA or Reader to suite your course needs. Please see the following table for a list of staff roles and their permissions.
Staff Roles and Permissions
Permissions | Instructor | TA/Reader |
Add or remove students | Yes | Yes |
Upload and manage submissions of instructor-uploaded assignments | Yes | Yes |
Receive notifications for all regrade requests | Yes | Yes |
Receive regrade request notifications for submissions they graded | Yes | Yes |
Duplicate or delete courses | Yes | No |
Names are visible to students on the course dashboard | Yes | No |
Letting students add themselves via entry code
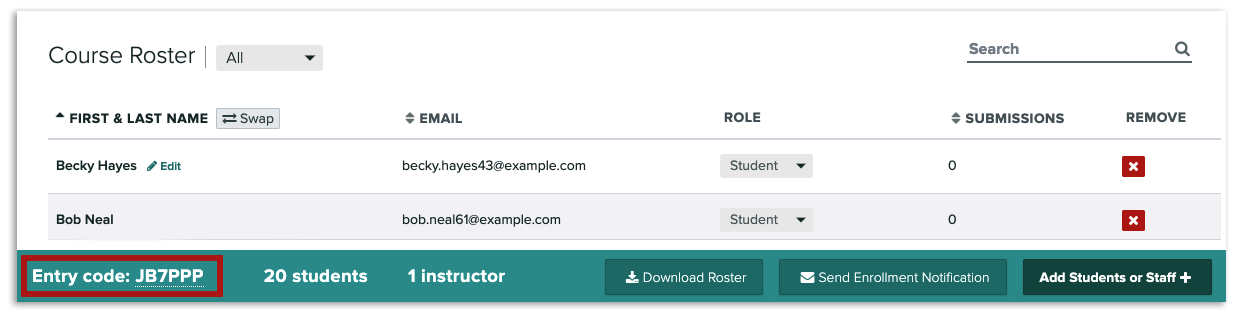
On the Course Settings page, you can enable or disable students' ability to self-enroll with an entry code. If you've enabled the self-enroll feature, you will see the course entry code in the footer of your course Roster page. Please note that you must share the entry code with your students for them to be able to add themselves to your course. If you'd like to see how the process works for students, check out the Adding a course article.
Adding students and staff
Prepping your roster file
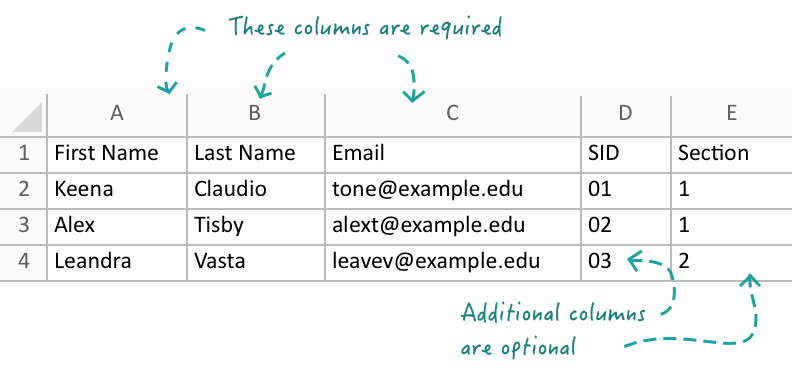
- You can add course members individually or in bulk via CSV file (recommended). If you're doing the latter, you will first need to prep your roster CSV file. Start by making sure each column in your CSV has a header.
- Use unique email addresses for each course member.
- You can either list full names in one column (see note below) or split first and last names into two columns (recommended).
- You can also add extra columns with course section details. Check out our guide for sections in the course roster.
Uploading a roster or adding individual users
- When you're ready to add individual users or your roster CSV, next go to the Roster page for your course (Course Dashboard > Roster, left sidebar).
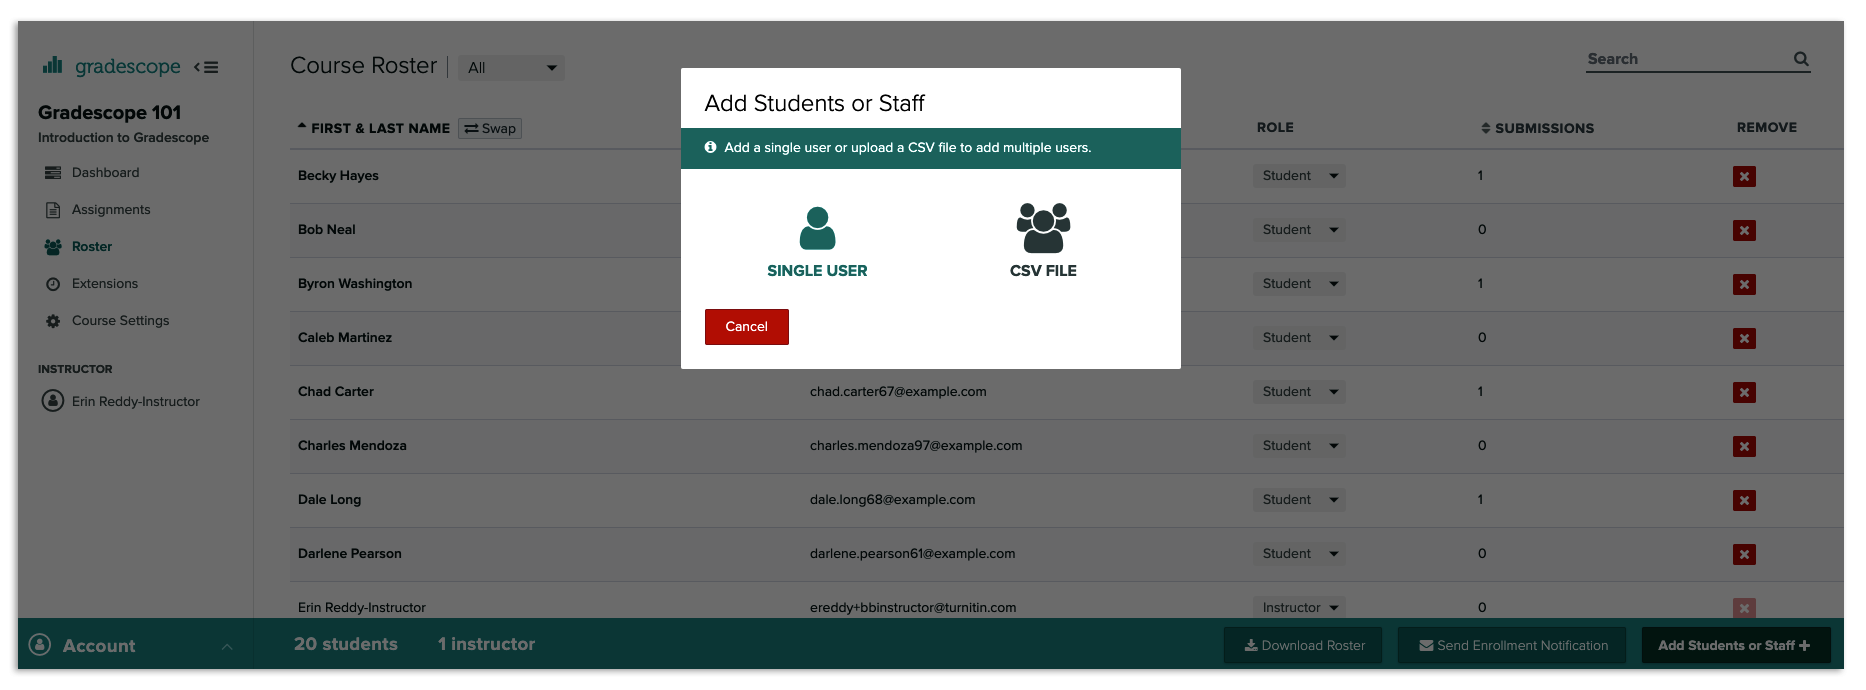
- On the Roster page, click the Add Students or Staff button in the bottom right corner. A dialog box with two buttons will appear. Click the appropriate button based on whether you're adding a single user or uploading a CSV file.
- If you're adding a single user, next you will be asked to give their first and last name, their email address (using school emails is best), and, optionally, their student ID, if the user is a student. Then, select their role and whether or not you'd like them to be notified of their course enrollment. Click Submit when you're finished.
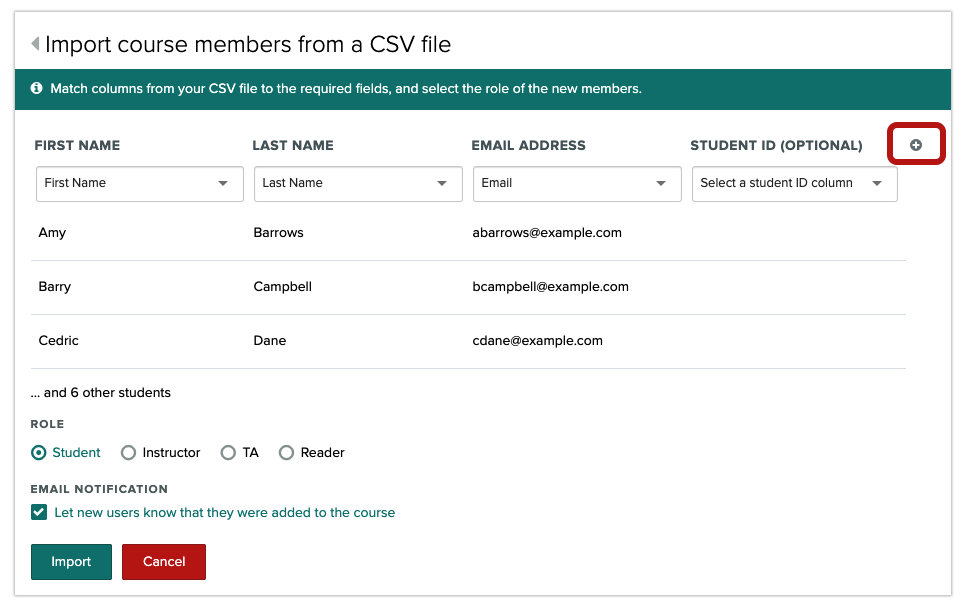
- If you're uploading a CSV, next you will see a dialog box where you will be asked to match the columns of your CSV with Gradescope fields. If a column shows up as blank, click on the drop-down menu to select the corresponding Gradescope field. If your CSV has separate columns for student first names and student last names, click My CSV file has separate first and last name columns. If you included additional columns on your spreadsheet such as class groups, press the + sign in the top right corner of the dialog box (see image below) to reveal a dropdown containing the names of the column headers you entered on your CSV file. Select the relevant column name from the dropdown. Click Import when you're finished.
Course enrollment email notifications
When to notify students about course enrollment
If you will be collecting and scanning in student work for the first assignment (e.g., an exam or quiz), we recommend waiting until grading for that assignment is complete to notify students that they have been added to your course. This is because on an instructor-submitted assignment, students can’t do anything in the system until they get their graded work back. You’ll be able to notify students later on, from the Review Grades step in the workflow.
If students will be submitting their work to Gradescope themselves for the first assignment (e.g., homework or a problem set), be sure to use one of the methods above to notify them as soon as they’ve been added to your course. This way, students can log in and submit their work as soon as possible.
Notifying users while enrolling them
You can choose to notify users from the dialog box as you enroll them in your course. To do this, select the checkbox that says “Let new users know that they were added to this course” at the bottom of the dialog box. All users who were just added to your course will receive an email about their enrollment with a link to set a password and log in.
Notifying students in a course after enrollment
You can also send a mass email about enrollment to all students who have been enrolled in the course at any time after uploading the roster file or adding them individually. Follow the quick steps below for how to do this:
- On your course Roster page (Course homepage > Roster, left sidebar), click Send Enrollment Notification in the bottom right. A dialog box will appear.
- In the dialog box, click the Send Emails button. Please note that students will only get an email about course enrollment this way if they haven’t logged in to Gradescope yet.
Modifying course member information
You can modify course member information on your course Roster page (Course Dashboard > Roster). Below are some changes you can make on your Roster page.
Adding class sections or additional columns after importing the roster
- To add new columns of info after you imported your roster file, first, click the Download Roster button on your Roster page to download a CSV of your current course roster.
- Add your new column of info to the spreadsheet. The column must have a header. If you're adding a column of student group names or section numbers and you want to grade in batches, the word "section" or "sections" must be in the column header (e.g., "Sections," "class section," "Lab Sections," "Peer review section"). Leave the Email Addresses column the same. Email addresses will be used to match rows in the file to existing students.
- Following the same roster import process as before, re-upload the spreadsheet by clicking the Add Students and Staff button on your current roster page in Gradescope.
- Once your file is uploaded, if you added a new column, make sure to press the + sign (see image below) on the roster import screen. Select the header name of your new column from the dropdown. Click Import when you're finished.
Making bulk roster changes
- Click the Download Roster button on your Roster page to download a CSV of your current course roster. Update the necessary info on your spreadsheet and be sure to leave the Email Addresses column the same. Email addresses will be used to match rows in the file to existing students.
- Following the same roster import process as before, re-upload the spreadsheet by clicking the Add Students and Staff button on your current roster page in Gradescope. Click Import when you're finished.
Editing student account info
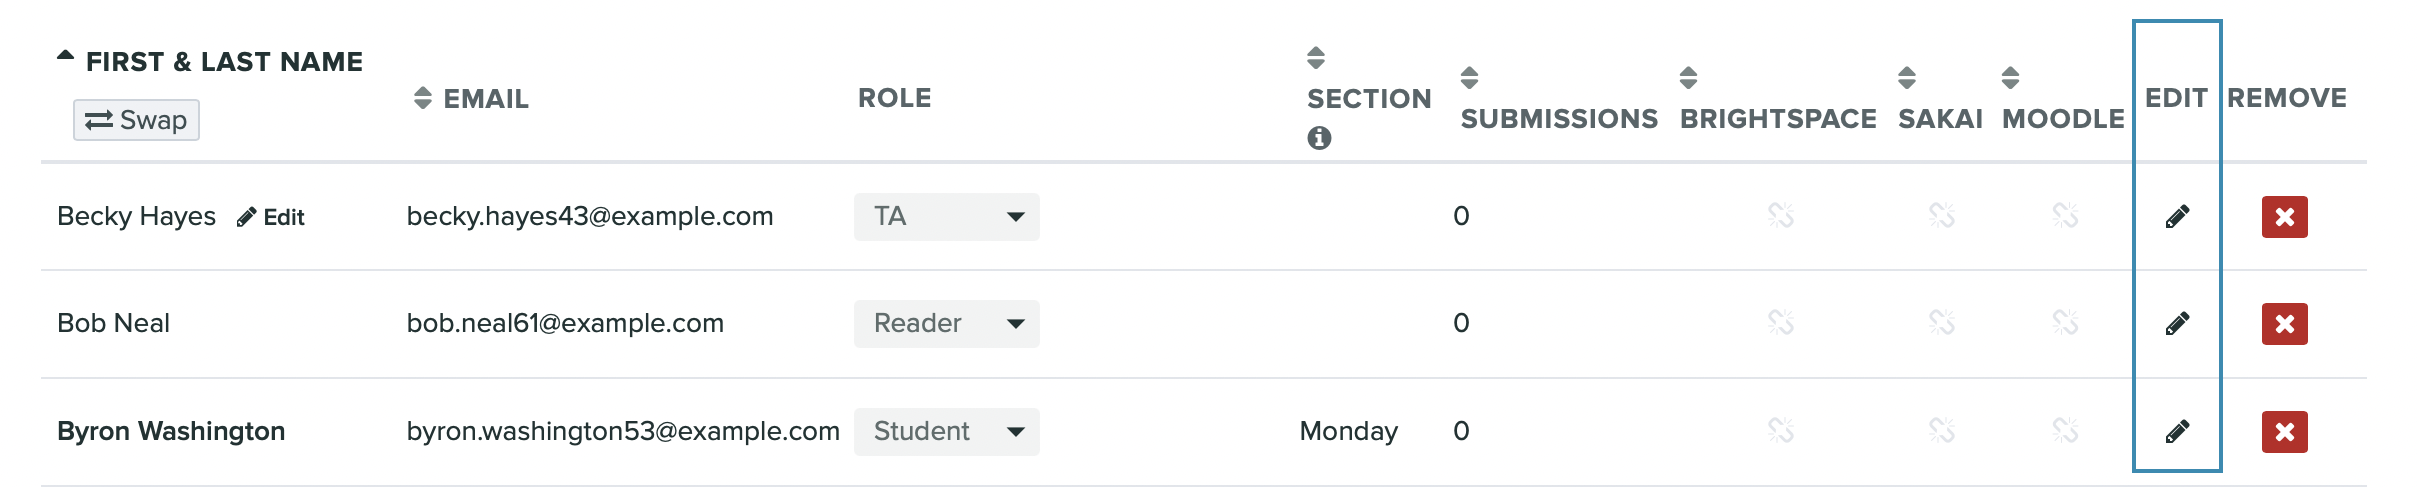
- To edit student account information, locate the Edit column and click the pencil icon.
- You won't be able to edit names on the roster for courses that are linked to the LMS via LTI 1.3.
- To update the email address for a student who has already logged in, or if their email is already associated with an account, you’ll need to email us.
- If a student appears more than once with different email addresses, advise your students to merge their accounts to avoid confusion with submissions and grading.
Switching first and last names
If your roster has separate columns for first and last names, you can alphabetize students by last name by using the Swap button at the top of the name column.
Downloading a roster
To download your roster as a CSV file, click Download Roster at the bottom of the Roster page.
Removing course members
Finally, you can use the X button in each row of your course roster to remove individual users from your roster. Deleting students from the roster does not delete any submissions and grades they already had in the course. If you ever want to bulk delete students from your roster, email us, and we can do this for you.
Viewing a student’s past grades
You can view a history of grades in your course for any student by clicking on the student’s name in the course roster. From here, you can also quickly jump to the submissions for that student. If the student has submitted to any assignments with anonymous grading enabled, submission information for those assignments will not be displayed. To find out more about anonymous grading, check out our guidance.
Adding students and staff via LMS integration
Check out our LMS Workflow section for instructions on how to sync a roster and add students and staff from your courses in Blackboard, Brightspace (D2L), Canvas, Moodle, and Sakai to Gradescope. The LMS Workflow section of the Help Center also contains step-by-step instructions, images, and gifs about how to use Gradescope with an LMS as an instructor and a student.
Alternatively, check out the LMS Integration video on our Get Started page to see how to connect your LMS to Gradescope and sync your roster from the Gradescope website. Please note that the video only shows one method for using Gradescope with an LMS, but updated videos for each LMS are in the works.