Table of Contents
Grading Submissions
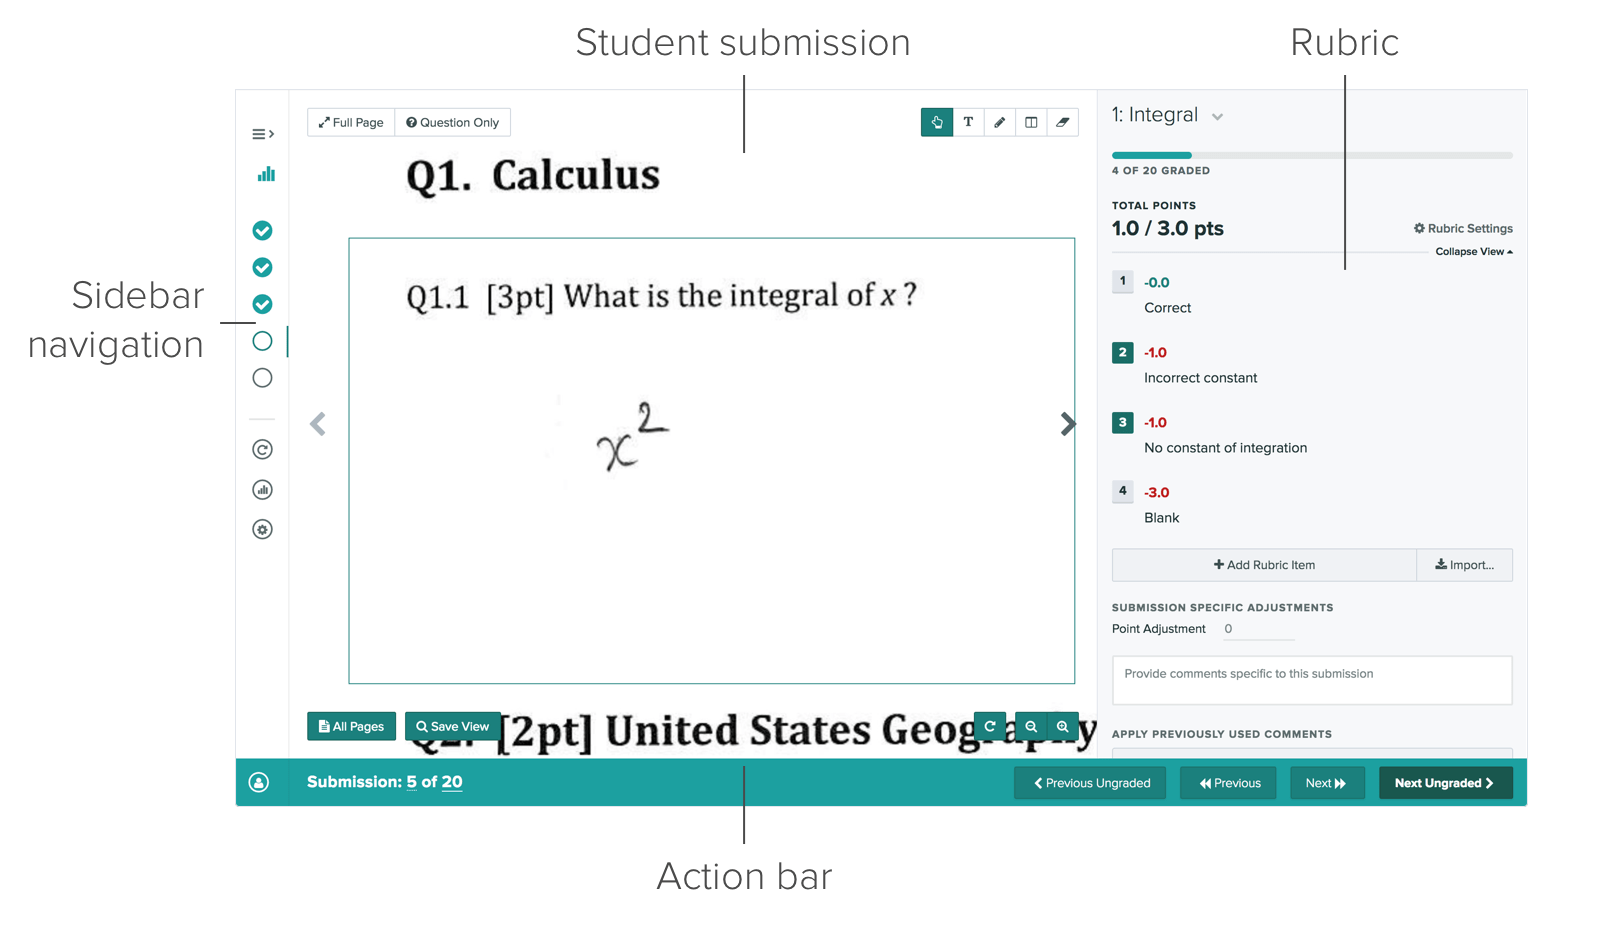
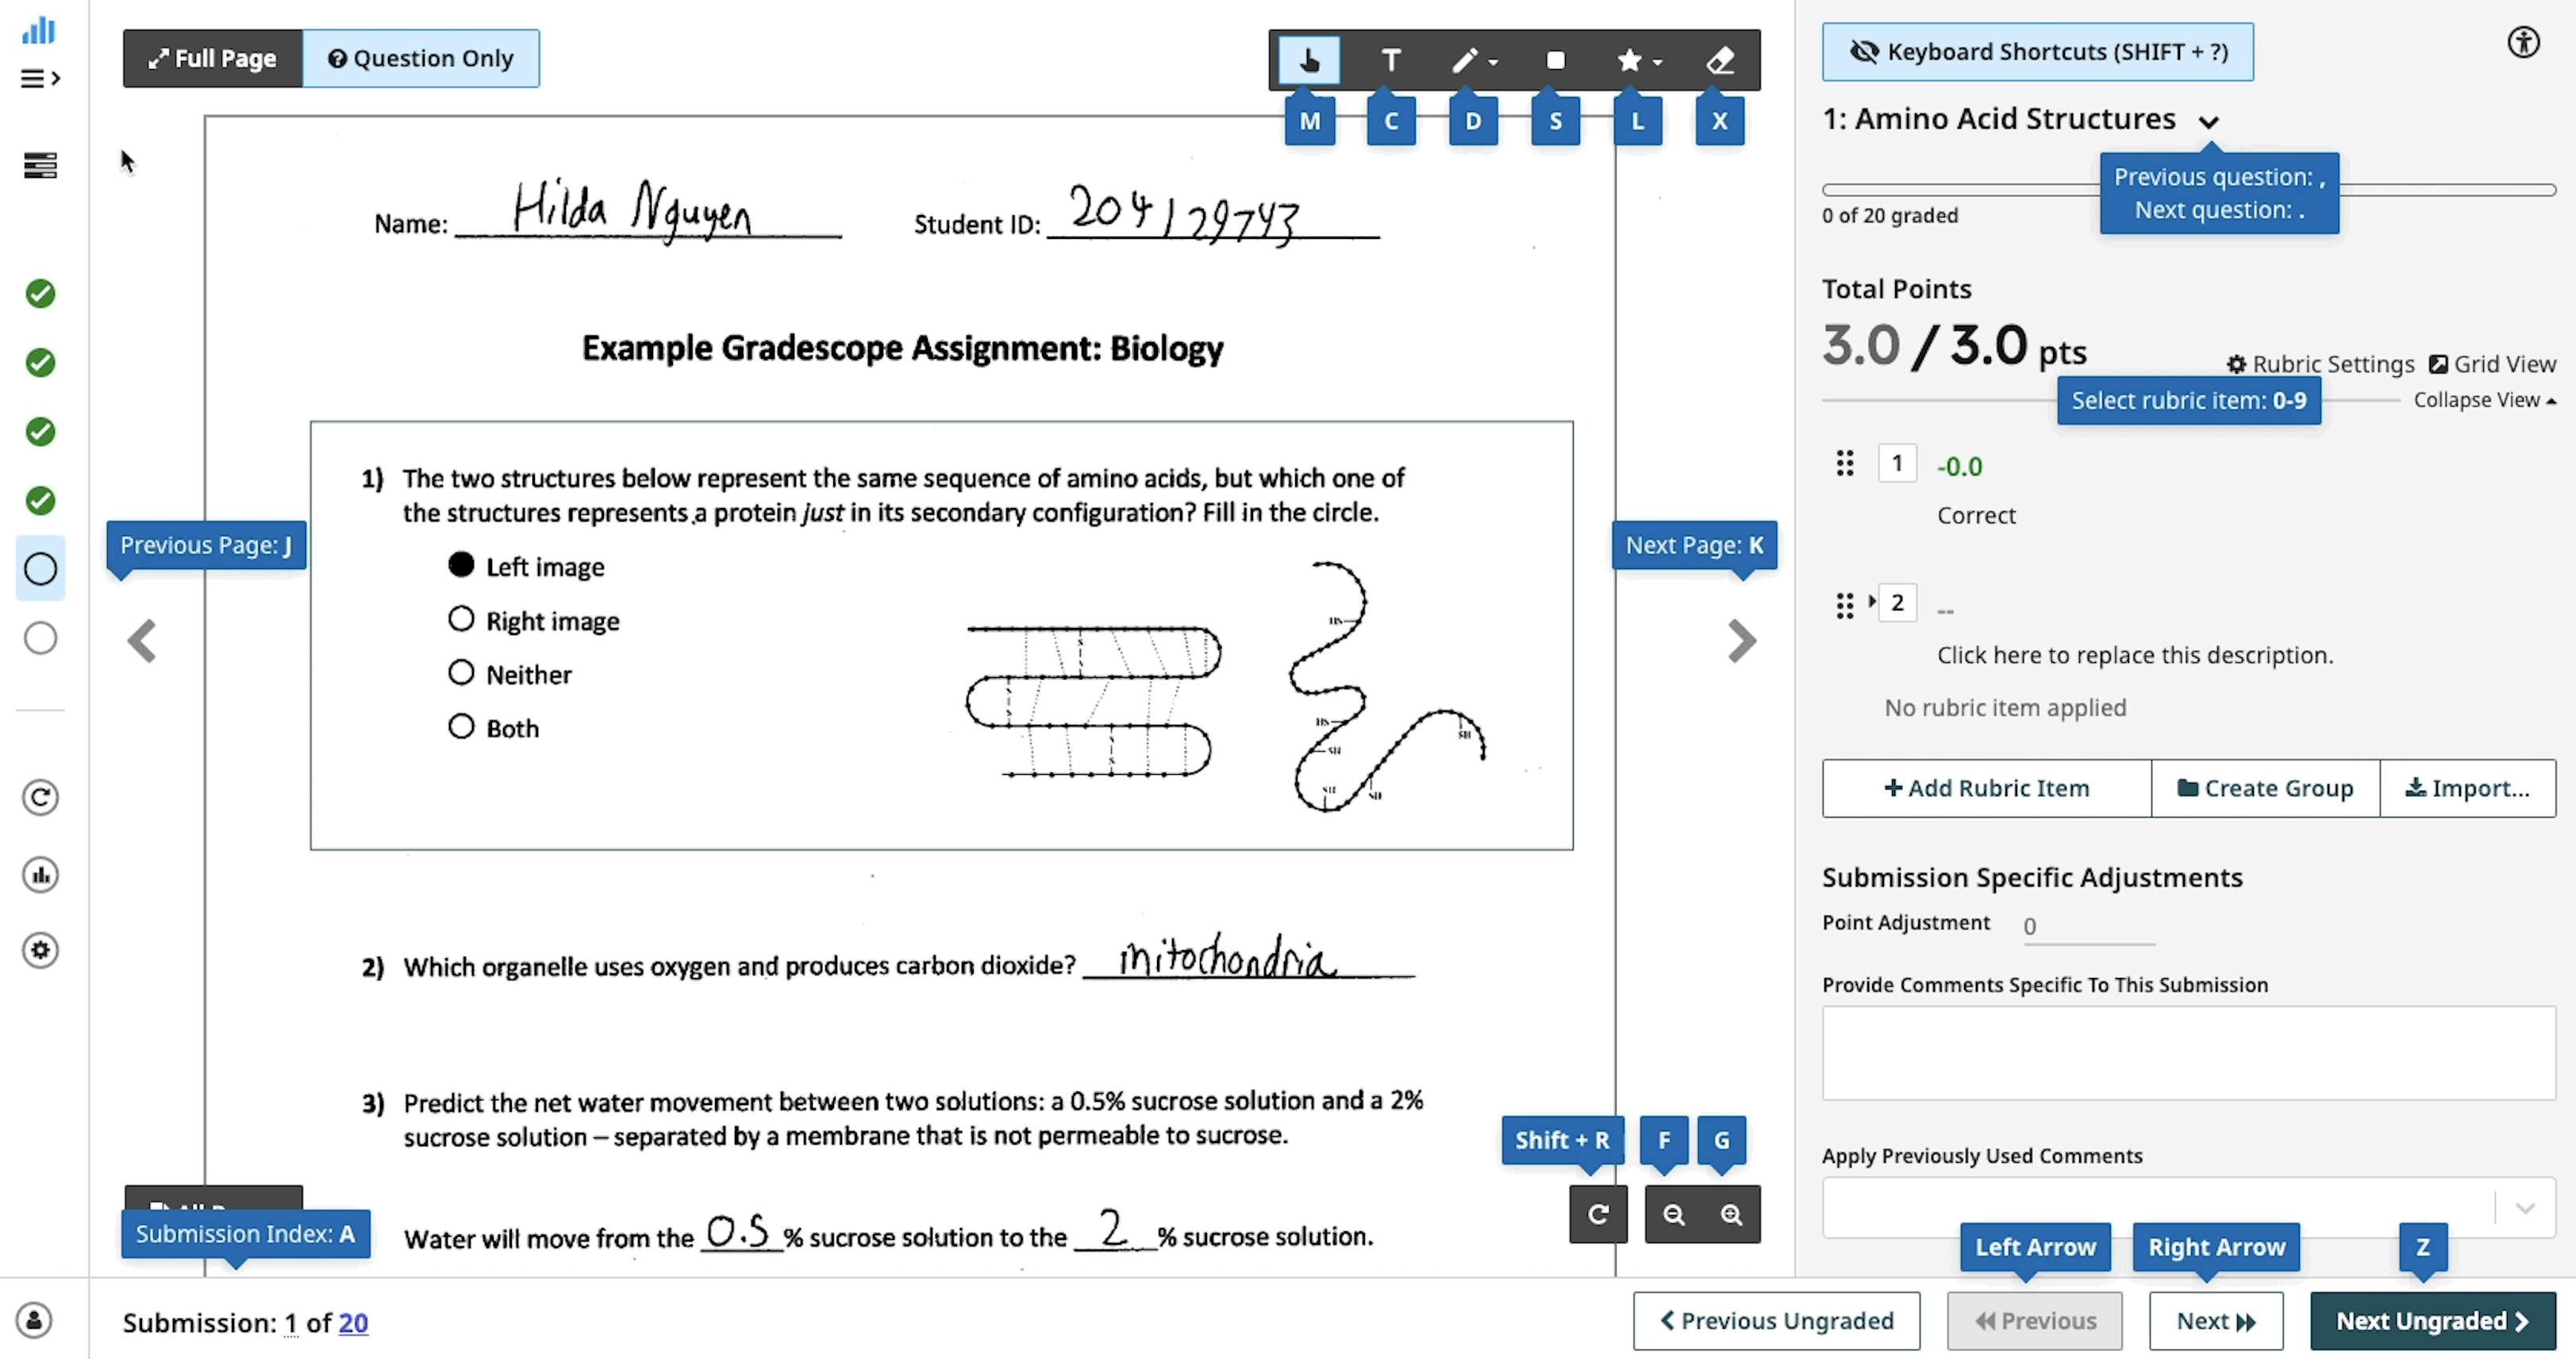
To begin grading, go to the Grade Submissions tab and click on the question that you would like to grade. There are three core components to the grading page. They are the student submission area, the rubric, and the bottom action bar.
Rubrics
Rubrics allow you to grade quickly and consistently, applying the same set of feedback to every submission. Gradescope rubrics are created for each individual question.
Types of rubrics
There are two formats of rubric available within Gradescope, list view (the default) and grid view (available on request).
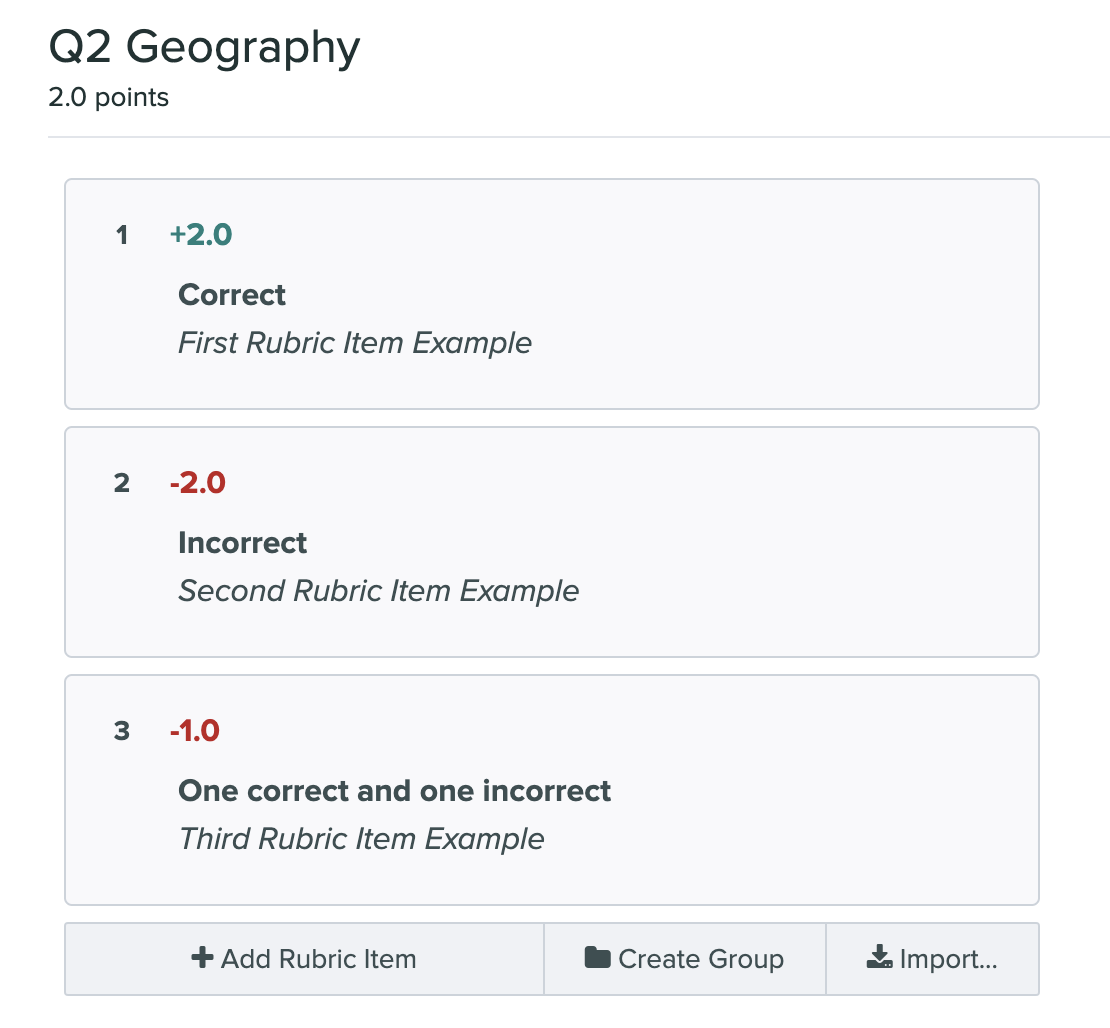
List view rubrics are made up of one or multiple Rubric Items, displayed in a vertical stack. Rubric Items contain a number of points as well as a description for the point value.
Grid view, also known as a "matrix rubric," enables you to add rows and columns of points and criteria to your rubric. This differs from the default “list view” which displays rubric items in a vertical stack.
If you plan to switch between the list and grid views of a rubric while grading, keep in mind:
- Rubric item groups (list view) = first column cells (grid view).
- Rubric items in each group (list view) = row cells (grid view).
Creating a rubric
When creating your assignment, you have two options to create your rubric:
- Create your rubric before receiving student submissions (Institutional license feature), or
- Create your rubric while grading submissions
Creating a rubric before student submission - Once you have finished creating your Assignment Outline, you will be directed to the Create Rubric page. If any questions do not receive a rubric on this page, you can return to create one later or while grading.
Templated and Online assignments will display a preview of each question, while variable length and programming assignments will list each question.
Creating a rubric while grading - When you are ready to begin grading, access the Grade Submissions tab of the assignment and select a question. A blank rubric is displayed to the right of the submission.
To begin creating your rubric:
- List view rubrics can be created on the assignment's Create Rubric page, or while grading questions. When creating your rubric on the Create Rubric page, ensure List View is selected from the options at the top right corner of the page.
- A default "Correct" rubric item is automatically available. Edit this rubric item to suit your grading by entering a point value and a description.
- Select + Add Rubric Item to add to your rubric until it is complete.
- To format or add images to your rubric item descriptions, use Markdown or LaTeX. Your rubric will be autosaved as you work.
- Grid rubrics can only be created on the assignment's Create Rubric page. If you're not already there, navigate to that page.
- Select Grid View from the options at the top right corner of the page.
- A blank rubric item will remain on the question. Delete it by selecting the x in the right corner of the box. Confirm the deletion.
- Select New Grid.
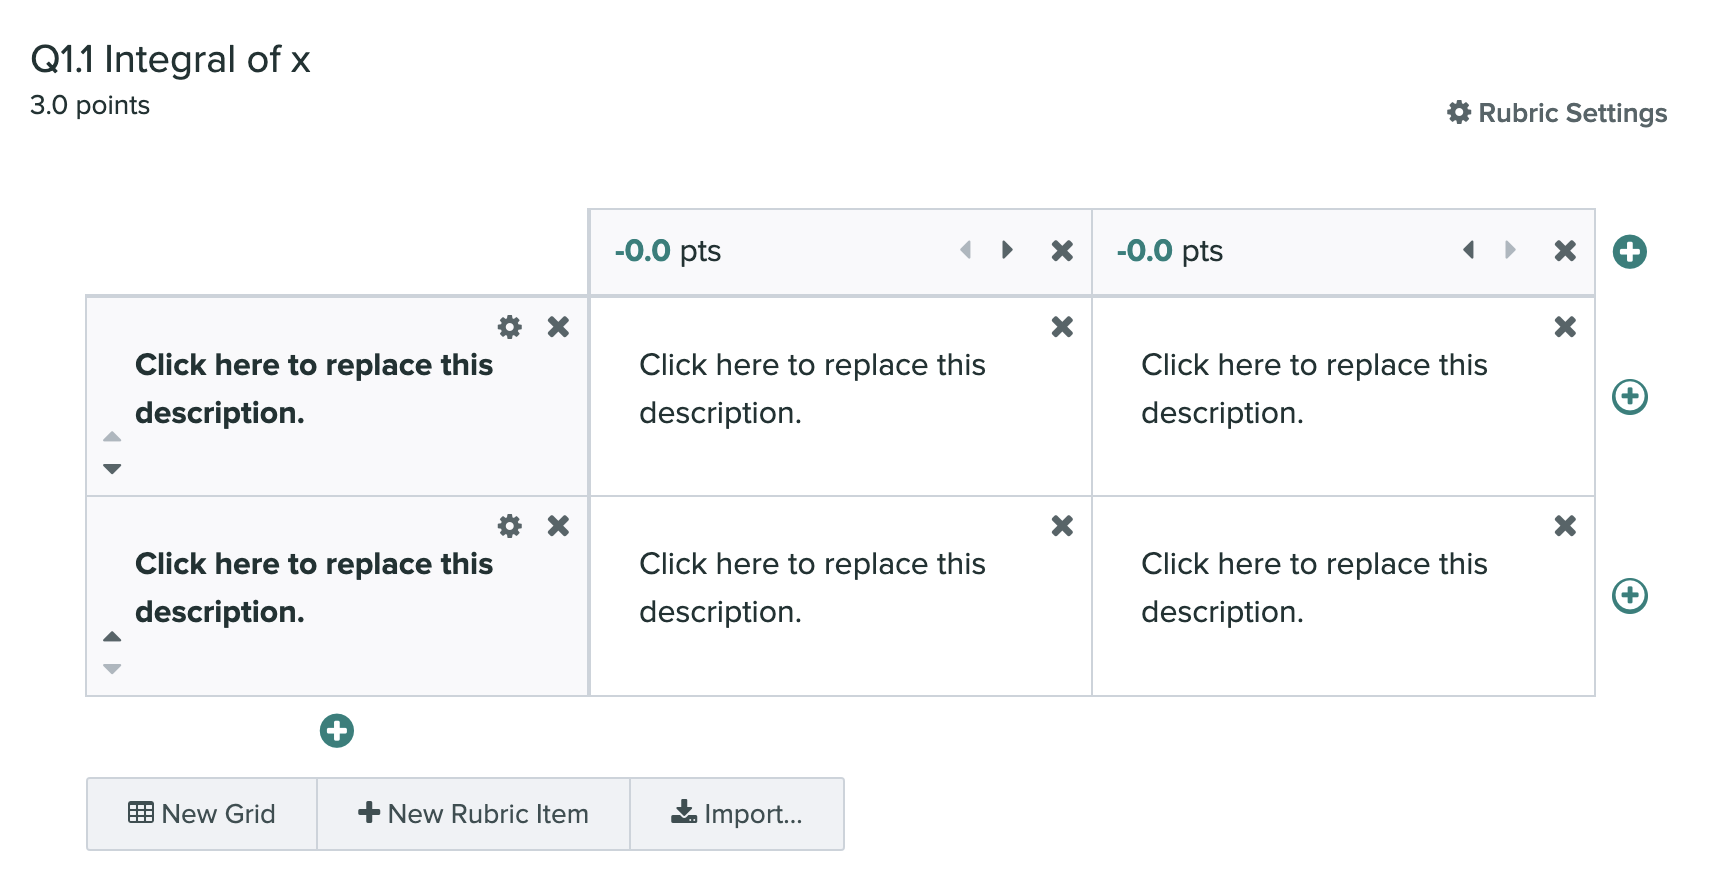
- A blank grid rubric with one row and one column will appear. Select the green circled + signs to add new columns and rows.
- For the gray cells at the beginning of each row, enter the categories of evaluation criteria for the assignment (e.g., Organization, Claim and Focus, Language and Style). For the gray cells at the top of each column, add the point values each performance level can achieve.Currently, you can only add point values into the top column cells of your grid rubric. We are working on the ability to add text to these cells.
- In the remaining white body cells, type or copy and paste in the descriptions of what the performance levels look like for each criterion. You can also add images and format your text using Markdown or LaTeX. Your rubric will be autosaved as you work.
- Need to reorder the rows? Arrows are provided in the grey boxes at the beginning of each row. Use the arrows in the gray row and column cells to move them up or down (rows) and left or right (columns).
- You can select New Grid again to add a separate grid with a different number of rows and columns. You can also select New Rubric Item to add a single detached rubric cell.
Importing rubrics
Rubric items and settings can be imported and reused across different questions or assignments, depending on your Gradescope license:
- Gradescope Basic - you can import rubrics from courses within the same term.
- Institutional license - you can import rubrics from any course in any term.
To reuse and import a rubric.
- Whether you are on the Create Rubric page or grading a question, select Import below the rubric. This will bring up a dialog box containing your courses, assignments that are in each course, and all question rubrics for each assignment.
- Select the course, then the assignment, and finally the question rubric you'd like to import.
- Then, select the Import Rubric button to copy it into your assignment.
Rubric item groups
Groups allow for your rubric to be structured in a variety of ways. You can batch similar rubric items together, provide more qualitative feedback on a sliding scale, easily grade multipart questions at once, and better communicate how points are awarded or taken off by providing more specific rubric items.
To create a rubric item group, select Create Group beside the “Add Rubric Item”. On smaller screens, select the additional actions arrow to reveal the option.

Once created, you can give a description for the group and create sub-items. You can also drag existing rubric items in and out of groups.
Mutually exclusive rubric groups
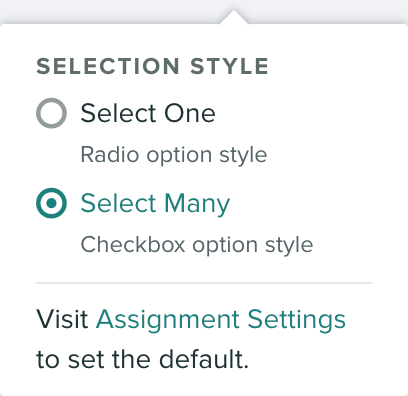
By default, graders can select multiple rubrics items within a group. However, if you want to limit selection to only one item, you can toggle the Selection Style from the settings menu to the right of the group name.
Keyboard shortcuts for rubric item groups
Use keyboard shortcuts! Rubric item groups are made with speed in mind and you can use keyboard shortcuts to expand and collapse groups. You can also use the escape key to get out of any group. Alternatively, if you wish to quickly jump to the next group, press the keyboard shortcut to open that group.
Example: Press “2” to open the group, press “Q” to apply the first rubric item, Press “3” to open the next group, etc..
Grading with rubrics
Go to the Grade Submissions page from the left sidebar of your assignment and select a question to grade. See the directions below for grading with a list view rubric and grading with a grid view rubric.
- To grade a submission using your list view rubric, select the appropriate rubric item (the box with a number in it) or type the number on your keyboard corresponding to the rubric item.At least one rubric item must be applied for the question to be considered graded, and you can select as many rubric items as you’d like for each submission.
- To reorder a rubric item, drag and drop the item, or select a rubric item and use the arrow keys on the keyboard.
- To condense your rubric items or fit more on the screen, select Collapse View.
- To move to the next submission for the same question, select Next Ungraded. Moving to the next ungraded submission avoids more than one staff member grading the same submission at the same time.
- From the right panel of the grading interface, select the Grid View link to view your rubric as a grid in a separate window.
- In the grid window, select the relevant rubric items to apply them to the student's submission. Their score will be updated accordingly.
- If you need to edit your rubric while in this window, select Edit Rubric (top of the grid window). Click inside the relevant cells and rework the content as needed. You can add images and format your text using Markdown or LaTeX. Except for in the header row and the first column (both gray) you can use the arrows in the rows and columns to move them up or down (rows) and left or right (columns). You can click the New Metric button again to add a separate grid with a different number of rows and columns. You can also click New Rubric Item to add a single detached rubric cell. Changes made here will auto-populate on the Create Rubric page too.
- Select Next Ungraded at the bottom of the grid window to grade the next question in this window.Can students view the rubric as a grid? No, students will only be able to view the rubric vertically as a list along with their awarded points on the View Submissions page.
Rubric settings
Formatting rubric items
If you'd like, you can use Markdown in rubric items to insert images, clickable links, code blocks, tables, bulleted and numbered lists, YouTube videos, bold/italicize text, and more. Simply click on the rubric item description box and either select one of the provided options or insert your custom Markdown command (see the gif below). For tips on using Markdown, check out the article on Formatting Text (Markdown).
Additionally, you can use LaTeX to add math symbols in rubric items, comments, text annotations, answer group names, and regrade requests and responses. For more details, check out the article on Writing Formulas and Equations (LaTeX).
Positive and negative scoring
By clicking on Rubric Settings, you will see that we support two different styles of grading. Positive Scoring means that rubric items default to adding points, starting from 0. On the other hand, with Negative Scoring (the default mode), rubric items default to subtracting points from the total points available for that question. If you want to have a rubric item that has the opposite effect of the default scoring style, you can change the sign before the point value from a minus (-) to a plus (+) or vice versa.
Point floors and ceilings
There are also options for a point ceiling to prevent scores greater than 100% and a point floor to prevent scores less than 0%. These are both enabled by default so that you don’t get scores out of the expected range, but you can disable them for extra credit questions, late penalties, or other situations where you don’t want the default behavior. You can set assignment-wide defaults for the scoring scheme and score bounds from the Settings page in the left sidebar.
Extra credit, bonus points, and penalties
Adjusting individual feedback and points
Rubric items are consistent for each question, which means that you can apply them to any number of submissions. However, sometimes you want to give local, individual feedback on a submission (e.g., you want to give one student extra credit or bonus points on one question). You can do this with Submission Specific Adjustments which allow you to add or subtract points as well as provide specific comments to the submission. To create a line or paragraph break in your comment, use Shift + Enter.
If you would like to see which submissions a specific rubric item has been applied to, you can click on the magnifying glass icon next to the rubric item.
The question navigation menu (top left of the rubric) allows you to move to a different question. Click on the question title and a drop-down menu of questions will appear, allowing you to jump to another part of the assessment.
Adjusting points assignment-wide
- If you need to, you can adjust points for an entire assignment after students have submitted (e.g., if you would like to give every student extra credit or bonus points). To do that, first go to the assignment, click Edit Outline in the left sidebar, and create a new question. It's recommended that you title the question something to indicate that it's an assignment-wide point adjustment. Give that question an overall point value of 0.
- Next click Grade Submissions in the left sidebar. Go to the first submission for this new question. On the first submission, click Rubric Settings. In the Rubric Settings, set the scoring type to positive scoring (to add points) or negative scoring (to subtract points), and disable the point floor and point ceiling.
- Then create a rubric item for this question that adds or subtract the number of points you want to add or subtract from every submission.
- Go through and apply this rubric item to each student. You can do this more quickly with keyboard shortcuts (click the "1" key on your keyboard to select the rubric item and click the "z" key to go to the next student). If this is a templated assignment, you can also use Manual Answer Grouping to assign all students' answers to one group and apply a rubric item or point adjustment to all students with a single click.
- When you're finished, all students will get a score out of 0 on this extra question, and their total assignment scores will go up or down by however many points you set for the rubric item on this extra question.
Annotations
When you grade Homework/Problem Set or Exam/Quiz assignments, you will have access to various annotation tools to allow graders to mark on a student’s submission. Students can see these marks, which can help them identify what part of the submission you want them to focus on. If you'd like to, you can also use LaTeX to add math symbols in comments, text annotations, answer group names, and regrade requests and responses. For more details, check out our article on Writing Formulas and Equations (LaTeX).
Annotation tools for Homework and Exam submission
- The navigation tool will help you place your annotations in the right spot by allowing you to click and drag to move around the submission.
- The text tool T (shown in gif below) allows you to type comments directly on the submission. After selecting it, click anywhere on the page to add text anchored to that spot. Or, to quickly add text from the navigation tool, just double-click on the page. Text annotations will be autosaved and can be reused. Text annotations are available with an Institutional license.
- The pencil tool allows you to write freeform on a submission in either a blue, green, or red color. Green and red colors are available with an Institutional license.
- The box tool allows you to draw boxes by clicking and dragging to create rectangles on top of the submission.
- The emoji tool (shown in gif) allows you to add emoji and other stickers to a submission. Once added, use the navigation tool to resize, rotate, or move an emoji on a submission. To delete an emoji, use the eraser tool. Any emoji you add to a student submission will also appear on the downloaded student submission PDF. The emoji tool is available with an Institutional license.Want to add an emoji to your text annotation?
You can add emoji to text annotations by right-clicking in the text annotation field and using your browser's emoji menu. You can also go to emojipedia.org and copy and paste an emoji directly into the text field.
Alternatively, for Macbooks, use cmd + click, or use cmd + ctrl + space to open the emoji picker in any browser. For Windows, use the Windows key + semicolon to open the emoji picker in any browser.
- The eraser tool allows you to click on any annotation to remove it.
Giving feedback and reusing comments
When using the Navigation or Text annotation tool, you are able to provide personalized feedback by adding comments as well as assigning them to rubric items.
- With a student's submission open in the grading interface, use your cursor to select where you want to place your annotation (click once when using the Text annotation tool or twice when using the Navigation tool). A small text box with Rubric and Comments tabs in it will appear. The Rubric tab will be open by default the first time you leave an annotation but will continue to default to the last tab you used.
- To link your annotation to a rubric item/rubric item group, scroll through the text box and select the relevant rubric item or group. When you link your annotation to the rubric, the rubric item will be applied by default. You can un-apply the rubric item if you wish by clicking on it on the rubric or using the corresponding number key on your keyboard, and the annotation will still be linked. Once you have linked to a rubric, you are given the option to leave a comment in the text box provided. To save your comment, press the Enter or Return key on your keyboard.
- To add a comment that’s not associated with a rubric item, select the Comments tab in the text box and type your feedback. To save your comment, press the Enter or Return key on your keyboard. You do not need to link to a rubric in order to leave a comment. The Comments tab will be open by default the next time you leave an annotation.
- You can add one rubric group/item and one comment per annotation. You can only perform one action at a time, so you will need to re-select your annotation to both link to a rubric and leave a comment. Multiple annotations can be linked to a single rubric item or rubric item group.
- To reuse a comment you have already added, begin creating your next annotation. When the text box appears, select the Comments tab. Your previous comments will be listed. Select a comment to reuse it. If a reused comment had a linked rubric group/item, the rubric group/item will also be linked to this annotation
- To remove your annotation or aspects of your annotation, you can:
- To remove a rubric group/item association attached to a comment while preserving the comment, double-click the annotation on the student's submission and select Clear Rubric Item. If there is a comment attached, it will remain.
- To remove a comment from an annotation that’s attached to a rubric group/item while preserving the rubric association, double-click the attached comment. Move your cursor to inside the comment's text box and delete the content. Press the Enter or Return key on your keyboard.
- To remove the entire annotation, select the red “X” that appears when you click the annotation - please note that this cannot be undone.
Submission Navigation
Submission view
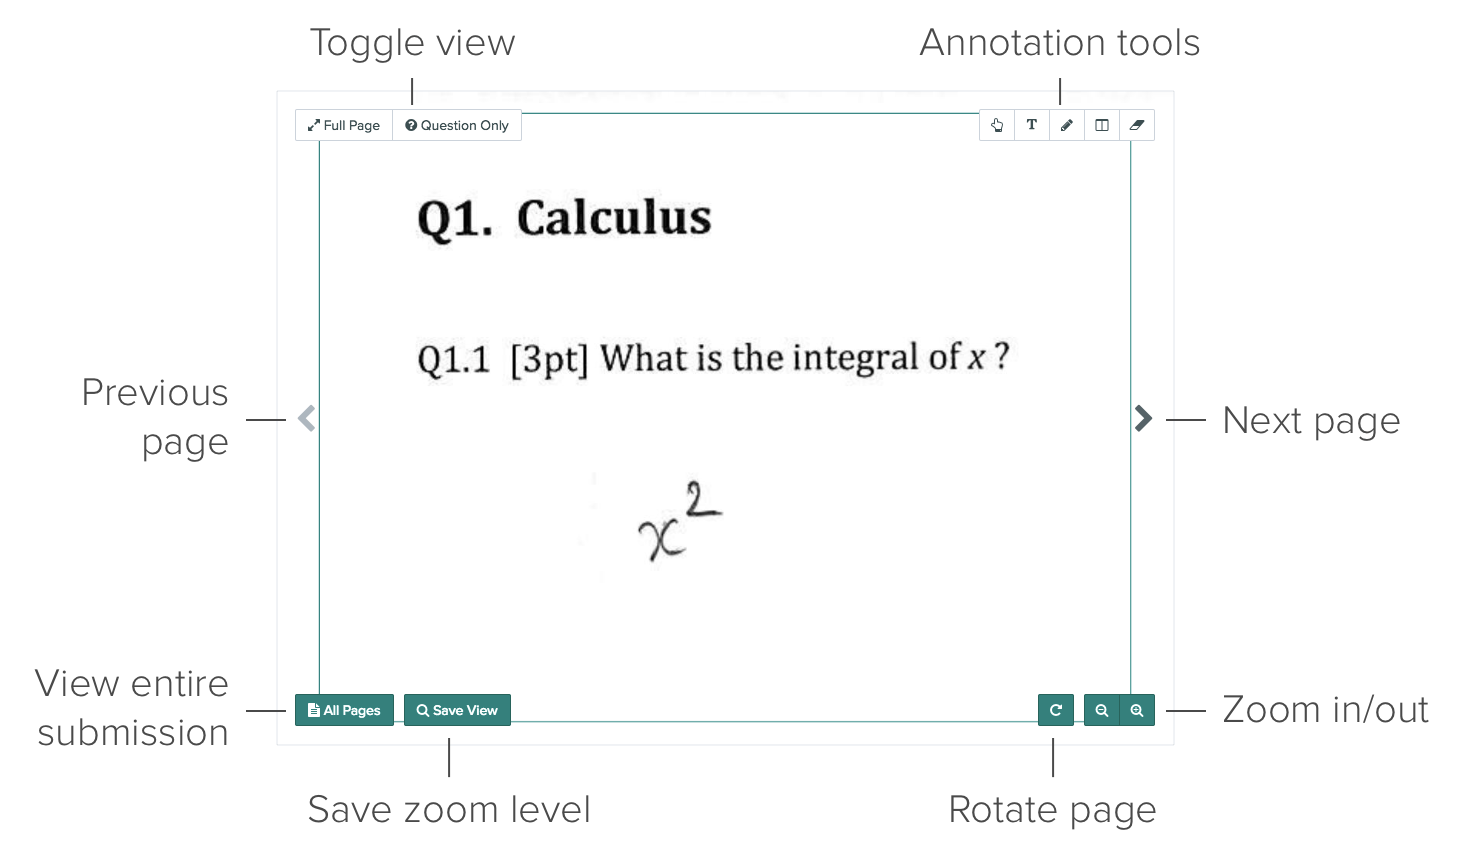
When you hover your mouse over the Submission View, more options appear that let you manipulate the submission.
In the top left, you can toggle between the full page view and the question-only view. The question-only view allows you to change your view to the region that you set up during the Edit Outline step. The Full Page view allows you to see the whole page of the submission.
If a student wrote their response on a different page than the location that you expected, you can use the View Next/Previous page arrows to navigate to other pages of the submission. You can also click All Pages (bottom left) to view all the pages of the submission and jump to another page. For variable-length assignments, any pages the student selected for that question will be highlighted.
Keyboard shortcuts to speed up grading
You can access the keyboard shortcuts map on the grading page by selecting shift + ? or by selecting Keyboard Shortcuts.
Keyboard shortcuts for annotations
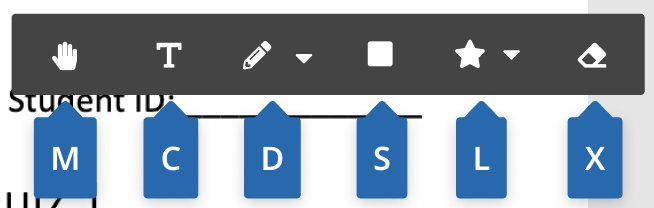
- M - Use the move tool to move the submission around. Also, move around any annotations or comments placed on the submission.
- C - Use the text tool to insert a comment on the submission.
- D - Use the pencil tool to write freehand on the submission.
- S - Use the shape tool to insert a variety of shapes on the submission.
- L - Use the emoji tool to insert a variety of emoji on the submission.
- X - Use the eraser tool to remove any annotation markups or comments from the submission.
Keyboard shortcuts for the question outline and rubric items
- , and . go up and down the question outline for an individual student’s submission
- The numbers 1-0 map to the rubric items that you create for each question
Keyboard shortcuts for the submission viewer
- Z goes to Next Ungraded (the same question or subquestion on the next student’s submission that hasn’t been graded or isn’t currently being graded by anyone on the staff)
- J and K go to the previous and next page of an individual student’s submission
- A displays the list of all student submissions for a given question
- shift+R rotates the student’s submission
- G and F zoom in and out of the student’s submission
- Right arrow goes to Next (the same question or subquestion on the next student’s submission), and left arrow goes to Previous
- B and N go to the previous and next submission by alphabetical order of students' first name.
Watch the video below for a demonstration on using keyboard shortcuts for faster grading.
To go to your last-viewed submission, you can use the back button in your browser. You may also open multiple tabs at once to grade multiple students’ submissions at the same time.
You can visit the Question Submissions Index by clicking on the total submission count, located in the lower-left corner. You can also access this page using the “a” keyboard shortcut. This page lists all the submissions for the question that you are on. It displays information such as the grader, the score that was given, and whether a submission was graded. If you are looking for a particular student’s submission to a question, this is an easy way to find it.
Zooming tools
There are also few ways to zoom.
- If you scroll over the submission you can zoom in/out
- You can click the plus (+) and minus (-) button in the bottom right while hovering over the submission.
- You can use the keyboard shortcuts f and g to zoom in/out
If you move the submission around or zoom in/out and want to save this view to be the default view for that question, you can click Save View.
Lastly, you can rotate the submission by clicking on the rotate button next to the zoom tools in the bottom right corner.
If students forgot to match questions to submission pages
When a student submits a PDF to a variable-length assignment, Gradescope will ask them to indicate which pages their answers to each question appear on in the submitted file. However, Gradescope still allows students to submit work even if they haven't matched each question to a page. Gradescope is configured this way to make sure students can turn in work even if they haven't finished the assignment and therefore can't assign questions to pages. You'll know a student turned in a PDF without assigning their questions to pages if you see an error message on your screen when you open their submission to grade it. If this is the case, below are a few tips and workarounds to fix the issue.
- Method 1 - As long as you have not graded the submission in question, you can ask the student to assign questions to pages in their submitted file. Note that students can still assign pages even after the due date or time limit has passed, but they will not be able to once you start grading. If you haven't already, feel free to share our Get Started video on submitting PDF homework with your students. The video goes over how to properly submit homework to Gradescope and assign questions to pages.
- Method 2 - Click through the student's submission manually to find and grade their answers. To move past the initial error message about unassigned pages, click the "K" key on your keyboard or click the All Pages button and select a page. This is recommended when anonymous grading is enabled.
- Method 3 - Select pages on a student's behalf on the Manage Submissions page. Note that this method is only recommended if a few students did not assign questions to pages and can be tedious to do for a large group of students. For instructions on how to do this, see Matching questions to submission pages on students' behalf.