Configuring Gradescope LTI 1.3 in Other LMSs
Updated
Configuring Gradescope LTI 1.3 in Other LMSs
If you are an institution and using an integration that is not listed on our help center, please contact your LMS provider and have them contact us via the above address.
Before you can begin configuring your LTI 1.3 integration, please email us at help@gradescope.com so that we can enable the integration permissions to your account. Once you have received our confirmation that your Gradescope account has the necessary permissions, you can continue onto the first step.
If you don’t have an account yet, go to the Gradescope website and select Sign Up. Select the Instructor role, fill out the provided form, and ensure you use the same email address you use for your LMS. You will be emailed with a link to set a password so that you are able to access your new account.
The configuration process consists of steps in both your LMS and Gradescope. Having both apps open in separate tabs could make the process easier. We recommend that you either complete the configuration process all at once, or on your test LMS environment if you think it may need to be completed in stages. Let’s get started!
Step One - Configuring in your LMS
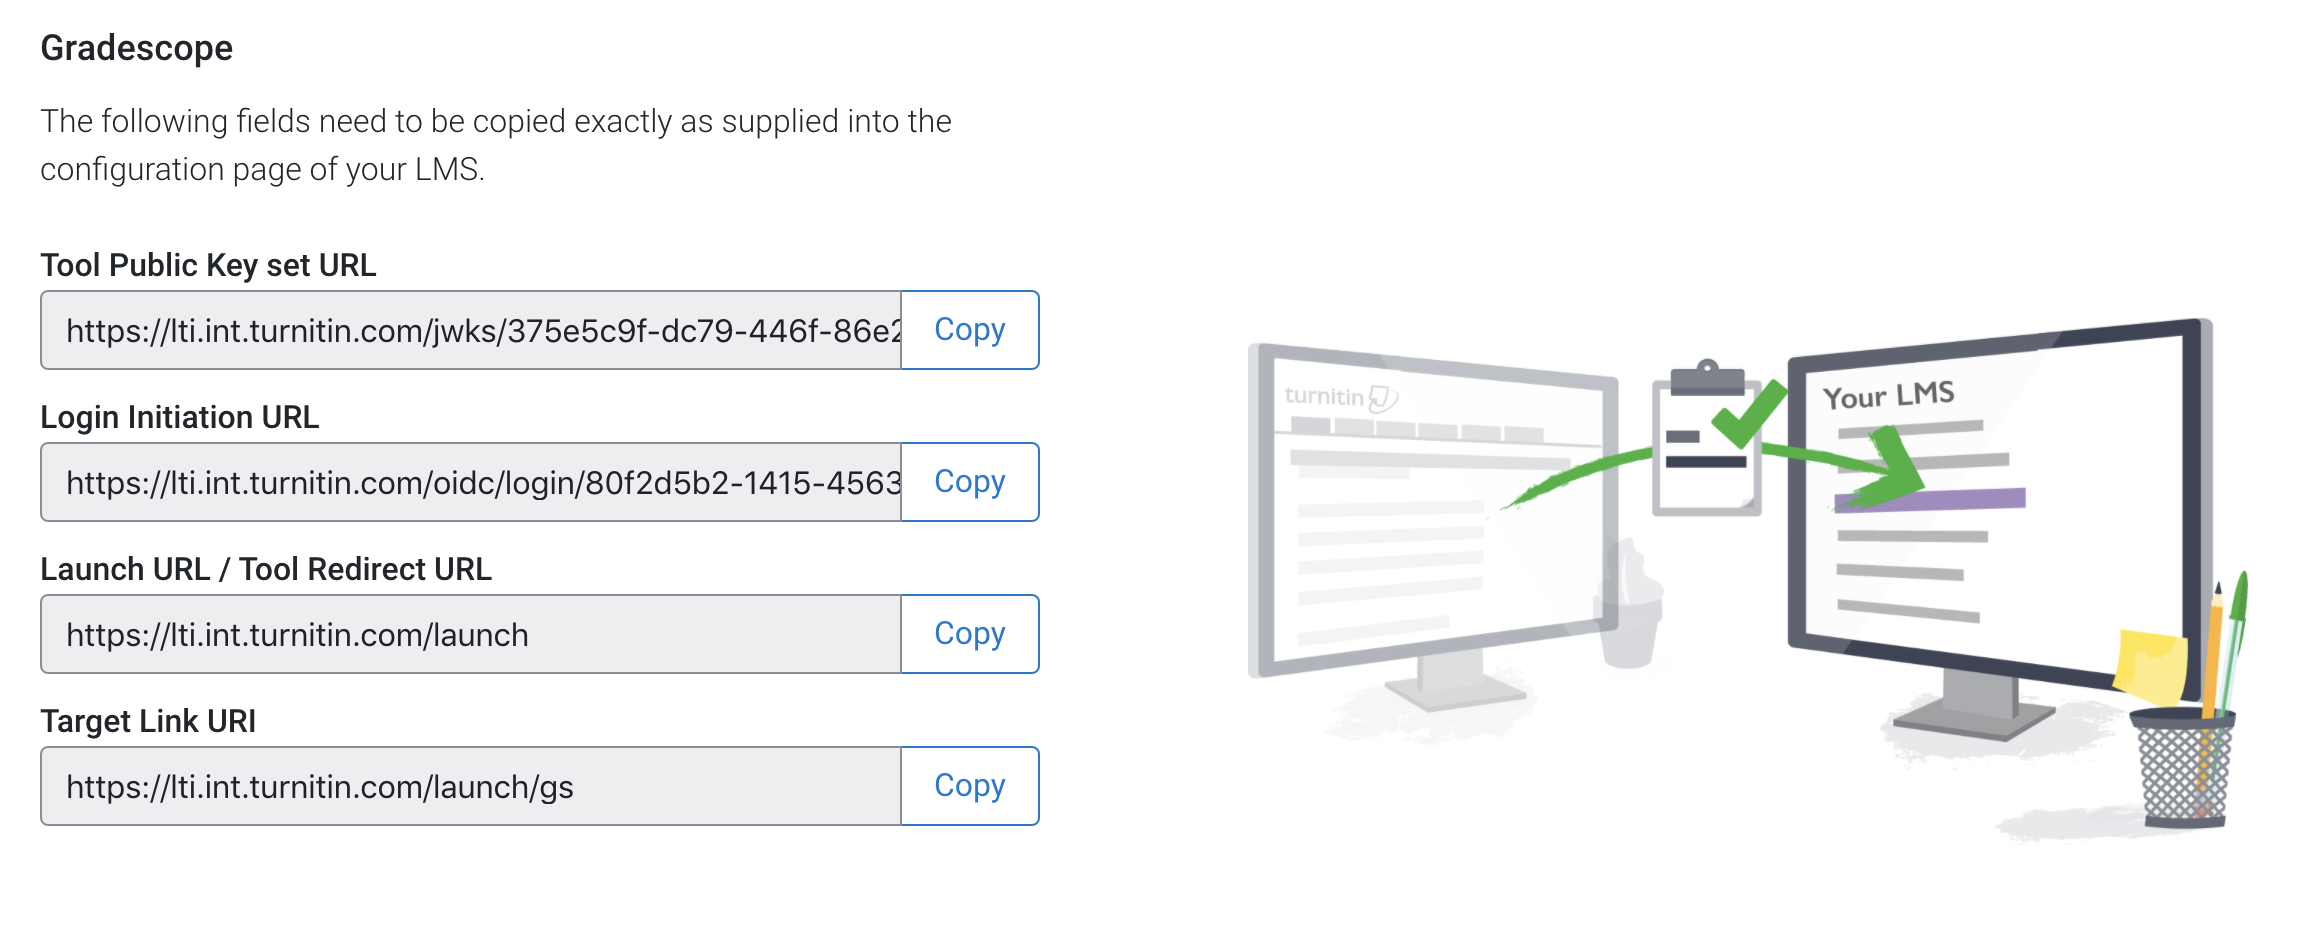
- Log into your Gradescope account that has the integration permissions enabled. It contains details that need to be copied into your LMS integration configuration page.
- Once logged in, select LTI 1.3 Integrations from the left side navigation and then select Configure Integration in the bottom right corner. If the “LTI 1.3 Integrations” option is not listed, please check you are logged into the correct account and then contact your account manager to have the integration permissions enabled.
- Select Create new registration and then choose Other from the drop-down menu. Change the Registration Name to a preferred name for your LMS integration.
- Two headings will appear, Gradescope and LMS Details. The details under the Gradescope heading need to be copied into your LMS. Once that has been done, your LMS will provide you with the information needed for the LMS Details section.
- Now that you have the information you need, open a new tab in your browser and log into your LMS administrator account.
- Access the external tool configuration page in your administrator settings.
- In the Name field, enter “Gradescope” or a similar phrase so that your instructors will recognise it as your Gradescope integration.
- If your institution will be using the gradescope.ca, gradescope.eu, or gradescope.com.au instance, in the Custom Parameters box enter your geographical location using the following indicators:If you are a Canvas user, you can enter your geographical location into the Custom Fields option found within the developer key Additional Settings instead.
- Gradescope.eu users enter - preferred_geography=eu
- Gradescope.ca users enter - preferred_geography=ca
- Gradescope.com.au users enter - preferred_geography=ap
- If you are using gradescope.com, you can leave this box blank.
- Copy the details listed in the Gradescope configuration page into their respective fields on your LMS configuration page. They may be named or ordered slightly differently.
- Save the configuration. It is possible that Gradescope may now appear as an option for your instructors, but they will receive error messages until the rest of the setup is complete if they attempt to create Gradescope courses or assignments via the LTI links in your LMS.
Step Two - Configuring in Gradescope
- Now that you have configured the necessary details in your LMS, you need to enter similar details into Gradescope provided by your LMS. The details are usually found in the settings of your newly configured Gradescope external tool.
- The title of the fields may be named or ordered slightly differently to the fields in Gradescope. Select Save in Gradescope once the details have been entered.
Step Three - Deployment
Gradescope is now installed and will be listed with your external tools. To complete the configuration, we need to link it to your account so that it can be used by instructors and students.
- Access a course in your LMS and select your newly configured Gradescope option.
- You may be prompted to log into Gradescope if you are not already. Please ensure you are logging into the account that has had the integration permissions enabled.
- Enter a Branded Platform Name, so that your instructors will recognize your LMS integration when viewed within Gradescope.
- Select your school.
- You’re done! Your instructors are now able to link their LMS LTI 1.3 courses to Gradescope, sync rosters, create and link assignments, and sync grades between Gradescope and your LMS.