Table of Contents
Configuring Gradescope LTI 1.3 in Canvas
Updated
Configuring Gradescope LTI 1.3 in Canvas as an Administrator
Do you have the necessary integration permissions? Before you can begin configuring your LTI 1.3 integration, please email us at help@gradescope.com so that we can enable the integration permissions to your account. Once you have received our confirmation that your Gradescope account has the necessary permissions, you can continue onto your configuration.
If you don’t have an account yet, go to the Gradescope website and select Sign Up. Select the Instructor role, fill out the provided form and ensure you use the same email address you use in Canvas. You will be emailed with a link to set a password so that you are able to access your new account.
Choose your install approach
You can install the Gradescope LTI 1.3 Canvas integration at either the root account or sub-account level depending on your institution’s preferences. Both installation approaches will work with the inherited key and manual key setups. We recommend installing at the sub-account level if certain departments have their own sub-accounts and you want to make the Gradescope LTI links available for some departments, but not others.
Choose your configuration key setup
To begin your Canvas integration, choose the setup tab that is right for your institution. For Gradescope.com users, you can use either the inherited key or the manual key configuration. For Gradescope.ca/.eu/.com.au users, you must use the manual key configuration.
- Inherited key setup - This configuration method uses the default Placement settings that display Gradescope LTI links in the Course Navigation menu, the Course Assignments menu (in Canvas), and the External Tool submission menu. This setup has fewer steps and is only available for gradescope.com users.
- Manual key setup - This configuration method allows you to customize the Placement settings where Gradescope LTI links display in Canvas. For example, you could specify for instructors and students to see the Gradescope LTI link at the assignment level but not at the course level (in the left-hand course navigation menu). This setup is available for both gradescope.com and gradescope.ca/.eu/.com.au users.
- To register LTI 1.3 in Canvas, log in as your LMS Administrator.
- Navigate to the Admin page using the left main menu and select your institution’s account name.
- Select Developer Keys. This option will not appear on any sub-accounts and must be set up using the main parent account.
- Select Inherited and ensure Gradescope is set to On.
- Select Settings, then Apps, and then View App Configurations.
- Select the blue + App button. A modal will appear.
- Set the Configuration Type to By Client ID and then enter the ID from the inherited Developer Key - 170000000000720. Select Submit and then Install.
Step One - Configuring in Canvas
- Log into your Gradescope account that has the integration permissions enabled. It contains details that need to be copied into your Canvas integration configuration page.
- Once logged in, select LTI 1.3 Integrations from the left side navigation and then select Configure Integration in the bottom right corner.If the LTI 1.3 Integrations option is not listed, please check you are logged into the correct account and then contact your account manager to have the integration permissions enabled.
- Select Create new registration and then choose Other from the drop-down menu. Change the Registration Name to Canvas or a preferred name for your Canvas integration.
- Two headings will appear, Gradescope and LMS Details. The details under the Gradescope heading need to be copied into Canvas.
- Now that you have the information you need, open a new tab in your browser and log into your Canvas administrator account.
- Select Admin from the left navigation menu and select your institution’s name.
- Select Developer Keys, + Developer Key, and then + LTI Key.
- Ensure Method is set to Manual Entry.
- For the Key Name, Title, and Description fields we recommend using “Gradescope” or something your instructors will recognise as your Gradescope integration.
- For the Owner Email field, we recommend using your integration administrator’s email address.
- The JWK Method should be set to Public JWK URL.
- Insert the information provided from Gradescope into the following fields:
- Tool Public Key set URL into Public JWK URL
- Login Initiation URL into OpenID Connect Initiation Url
- Launch URL/Tool Redirect URL into Redirect URIs
- Target Link URI into Target Link URI
- Select the LTI Advantage Services drop-down and ensure the top 6 options are enabled.
- Can create and view assignment data in the gradebook associated with the tool.
- Can view assignment data in the gradebook associated with the tool.
- Can view submission data for assignments associated with the tool.
- Can create and update submission results for assignments associated with the tool.
- Can retrieve user data associated with the context the tool is installed in.
- Can update public jwk for LTI services.
- Expand the Additional Settings dropdown and make the following edits:
- For Domain, enter turnitin.com.
- In Custom Fields, add a preferred geography specification depending on which instance your institution will use:
- Gradescope.eu users enter - preferred_geography=eu
- Gradescope.ca users enter - preferred_geography=ca
- Gradescope.com.au users enter - preferred_geography=ap
- In Custom Fields, add the section names data to a new line - section_names=$com.instructure.User.sectionNames
- Ensure the Privacy Level is set to Public.
If you are using a gradescope.com instance, you can skip this and go to step 14c. - For Placements, add your preference for where Gradescope will display for your instructors and students:
- Course Navigation - Displays Gradescope as an option in the course navigation menu on the left sidebar. If configured, this placement will display by default for all courses at your institution at the sub-account or root account level (depending on where you’re installing the integration). This allows instructors and students to access the linked Gradescope course and all assignments through their Canvas course's dashboard.
- Course Assignments Menu - Displays Gradescope as an option in the dotted drop-down menu (three dots icon) in the top right corner on the Assignments page. This allows instructors to link new Canvas assignments to Gradescope. This placement is required for instructors to link new Canvas assignments to Gradescope assignments.
- Assignment Selection - Displays Gradescope as an option for instructors within the Canvas assignment and is configured on the individual assignment page in the Submission Type section. This allows instructors to link and create the assignment as an external tool submission. This placement is required for instructors to link existing Canvas assignments to Gradescope assignments.
Individual instructors can hide the Course Navigation link (which will display by default) from their Course Settings in Canvas.Without the Course Navigation placement, instructors and students will have to access Gradescope course-level settings and functions like Roster Sync by backtracking and using a specific assignment's link. This could result in instructors having trouble locating the option to sync the course roster as well as students having trouble finding Gradescope assignments that may not be linked to Canvas.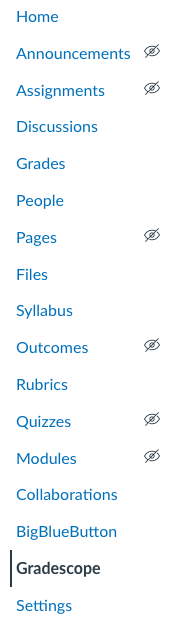 We recommend this placement for instructors because it can be located easily and requires the least amount of click-work to find.For instructors to link existing Canvas assignments and new Canvas assignments to Gradescope assignments, both the Course Assignments Menu and Assignment Selection placements are required.
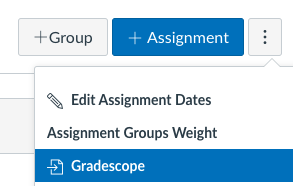 For instructors to link existing Canvas assignments and new Canvas assignments to Gradescope assignments, both the Course Assignments Menu and Assignment Selection placements are required.
- Leave the settings within the Course Navigation blank, but for Course Assignments Menu and Assignment Selection ensure Select Message Type is set to LtiDeepLinkingRequest.

- You have completed the Developer Key set up, select Save.
- Gradescope will now be listed within your Developer Keys. Ensure its State is changed to ON.
- Setup Gradescope to be an external app within Canvas.
- Copy the Client ID from beneath the Details column of your newly created Gradescope developer key.
- Select Settings from the left sidebar navigation.
- Select the Apps tab and then View App Configuration.
- From here you can create a new External App. Select the + App button.
- Change the Configuration Type to By Client ID and enter the ID that you copied from the Developer Key Details column.
- Select Submit and then Install to confirm.
- Now that you have configured the necessary details in Canvas, you need to enter details into Gradescope. Return to the LTI 1.3 configuration page within Gradescope.
- Under the LMS Details heading, enter the following information into the listed fields:
- Replace each instance of the sso.canvaslms.com base URL with sso.test.canvaslms.com or sso.beta.canvaslms.com while keeping the rest of the URLs the same.
- Make sure the Issuer field in step ii has the https://canvas.test.instructure.com or https://canvas.beta.instructure.com URL.
- Platform public key set URL - https://sso.canvaslms.com/api/lti/security/jwks
- Issuer - https://canvas.instructure.com
Make sure you copy the issuer link as is. Do not add any additional characters at the end like a slash (/), otherwise your registration attempt will fail.
- Client ID - Copy the Client ID from beneath the Details column of your newly created Gradescope developer key.
- Access Token URL- https://sso.canvaslms.com/login/oauth2/token
- OpenID connect login endpoint - https://sso.canvaslms.com/api/lti/authorize_redirect
- Leave Platform authorization provider blank.
- When setting up in a Canvas test instance, make sure the URLs have sso.test.canvaslms.com for their domains and the Issuer field has the https://canvas.test.instructure.com or https://canvas.beta.instructure.com URL, as shown in the following image.
- Select Save on the Gradescope configuration page.
If you are setting up a Gradescope LTI 1.3 integration on a Canvas beta or testing instance (before deploying in production):For an example, see the LMS details image in step vii.


Step Two - Configuring in Gradescope
Deployment
Gradescope is now installed and will be listed within your External Tools. To complete the configuration, we need to link it to your account so that it can be used by instructors and students.
- Select Courses from the main menu on the left and select a course.
- Select Gradescope which is now listed within your course sidebar navigation.
- You might be prompted to log into Gradescope if you are not already. Please ensure you are logging into the account that has had the integration permissions enabled.
- Enter your Branded Platform Name and select your school. This will be the name that instructors will see in Gradescope when referring to your Canvas integration. We recommend using a name that instructors will easily associate with your Canvas LMS.
You’re done! Your instructors are now able to link their Canvas courses to Gradescope, sync rosters, create and link assignments, and sync grades between Gradescope and Canvas. Want to know how? Check out our Canvas instructor guidance. We also provide guidance for your students.