Table of Contents
Configuring Gradescope LTI 1.3 in Brightspace (D2L)
Updated
Configuring Gradescope LTI 1.3 in Brightspace (D2L)
Before you can begin configuring your LTI 1.3 integration, please email us at help@gradescope.com so that we can enable the integration permissions to your account. Once you have received our confirmation that your Gradescope account has the necessary permissions, you can continue onto the first step.
If you don’t have an account yet, go to the Gradescope website and select Sign Up. Select the Instructor role, fill out the provided form and ensure you use the same email address you use on Brightspace (D2L). You will be emailed with a link to set a password so that you are able to access your new account.
The configuration process consists of steps in both Brightspace (D2L) and Gradescope. Having both apps open in separate tabs could make the process easier. We recommend that you either complete the configuration process all at once, or on your test Brightspace (D2L) environment if you think it may need to be completed in stages. Let’s get started!
Step One - Registering LTI 1.3
- Log into your Gradescope account that has the integration permissions enabled. It contains details that need to be copied into your Brightspace (D2L) integration configuration page.
- Once logged in, select LTI 1.3 Integrations from the left side navigation and then select Configure Integration in the bottom right corner. If the “LTI 1.3 Integrations” option is not listed, please check you are logged into the correct account and then contact your account manager to have the integration permissions enabled.
- Select Create new registration and then select Brightspace from the drop-down menu. Two headings will appear, Gradescope and LMS Details. The details under the Gradescope heading need to be copied into Brightspace (D2L). Once that has been done, Brightspace (D2L) will provide you with the information needed for the LMS Details section.
- Open a new tab in your browser and log into your Brightspace (D2L) administrator account.
- Select the settings cog from your homepage and then select Manage Extensibility.
- Select LTI Advantage from the top navigation and then select the Register Tool button.
- Select Standard.
- Leave Enabled turned on.
- In the Name field, enter “Gradescope” or a similar phrase so that your instructors will recognize it as your Gradescope integration.
- Copy each of the following details into the corresponding fields on the Gradescope configuration page.
- Domain
- Redirect URLs
- OpenID Connect Login URL
- Target Link URL
- Keyset URL
- Select all of the options for Extensions and Roles.
- Complete the Custom Parameters box as follows:
- If you are using the gradescope.com instance, leave this box blank.
- If you are using one of the following instances, enter the preferred_geography parameter as shown.
Instance | Custom Parameters Name | Custom Parameters Value |
Gradescope.eu | preferred_geography | eu |
Gradescope.ca | preferred_geography | ca |
Gradescope.com.au | preferred_geography | ap |
- Select Register. A modal will appear with details that will need to be copied across into Gradescope.
- In the Brightspace (D2L) modal, copy each of the following details and paste them into the corresponding fields in the LMS Details section in Gradescope.
- Client ID
- Brightspace Keyset URL
- Brightspace OAuth2 Access token URL
- OpenID Connect Authentication Endpoint
- Brightspace OAuth2 Audience
- Issuer
- Optional: Sync student ID values from Brightspace (D2L) to Gradescope:We highly recommend syncing student ID values because it increases the accuracy of auto-matching of scanned exams to student names for instructor-uploaded exams.
When student IDs are not synced from your LMS, instructors will have to manually assign student ID values via a CSV upload on the Gradescope course roster.- Make sure that the OrgDefinedId field in your Brightspace environment contains student ID values.
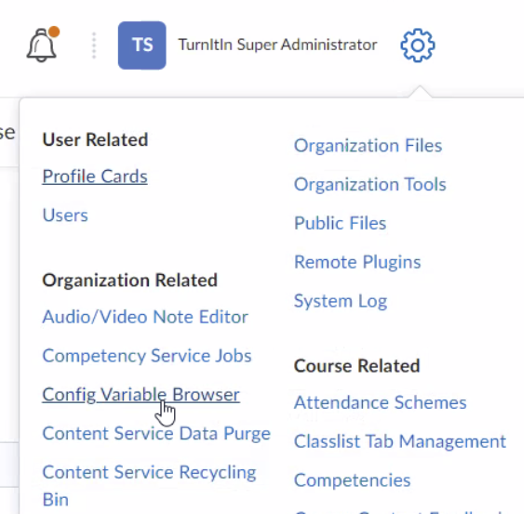
- Select Config Variable Browser from the Admin settings (gear icon).
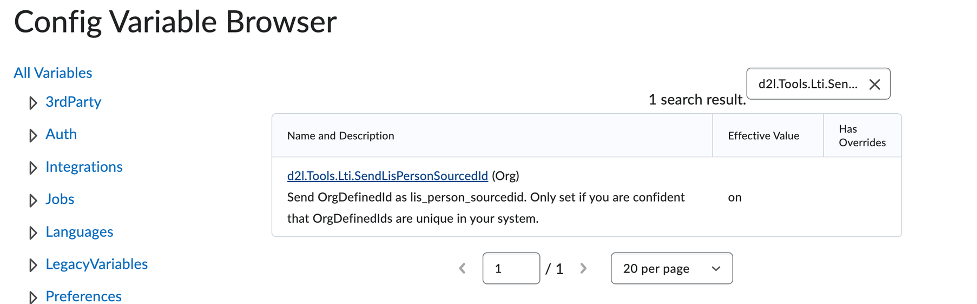
- Paste d2l.Tools.Lti.SendLisPersonSourcedId into the search bar in the top right.
- To edit the ID's properties, select the d2l.Tools.Lti.SendLisPersonSourcedId ID link under Name and Description.
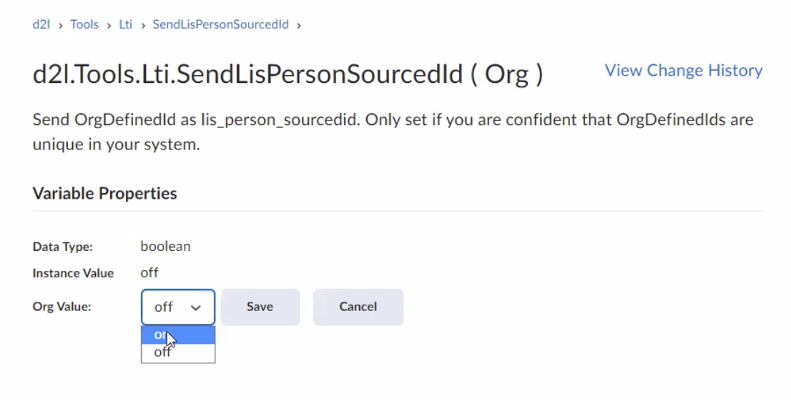
- For the Variable Properties, change the Instance Value and Org Value to On.
- Select Save on the Gradescope configuration page.
Step Two - Adding the Deployment Tool
- Select the newly-configured Gradescope tool from the LTI Advantage page.
- Scroll to the bottom of the settings and select View Deployments.
- Select New Deployment.
- Leave Enabled turned on.
- Select your newly created Gradescope tool from the Tool dropdown.
- In the Name field, enter “Gradescope” or something your instructors will recognize as your Gradescope integration.
- Select all three Extensions.
- Select all options under the Security Settings except for Anonymous.
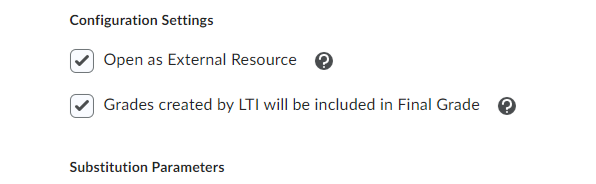
- Select your preferences for the Configuration Settings:
- Open as External Resource (recommended) - enables the linked Gradescope course and assignments to open in a new tab. If not selected, Gradescope will open embedded within your D2L window.
- Grades created by LTI will be included in Final Grade (recommended) - syncs the grades from Gradescope to your D2L gradebook and includes them in the final grade for the course. If not selected, the grades will show in the D2L gradebook but not be counted toward part of the final grade.
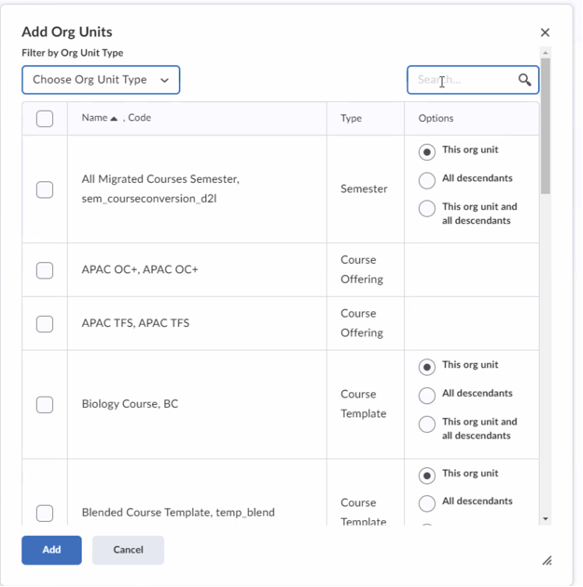
- Add Org Units and make sure to add all descendants, and then select any org units and unit types that should have access to Gradescope. Select Add to close this modal.
- Select Create Deployment.
Step Three - Create the LTI links
We recommend creating two links: one course-level Basic Launch link and one assignment-level Deep Linking Quicklink. Repeat the process below for each link.
- Select the newly-configured Gradescope deployment. Scroll to the bottom of the settings and select View Link.
- Select New Link.
- Leave Enabled turned on.
- In the Name field, enter “Gradescope” or something your instructors will recognise as your Gradescope integration.
- For the URL, enter https://lti.int.turnitin.com/launch/gs
- For your link Type, we recommend that you create two types in the order listed below. You can only create one link type at a time.
- For an assignment-level link, select Deep Linking Quicklink and set the width and height values to 800.
- For a course-level link, select Basic Launch.
Creating a course-level link will allow instructors and students to access Gradescope course-level settings and functions like Roster Sync within their D2L environment. Without a Gradescope course-level link, they will have to backtrack and access these settings via the assignment link. This could result in instructors having trouble locating the option to sync the course roster as well as students having trouble finding Gradescope assignments that may not be linked to D2L.If you don't want the Gradescope LTI link to be visible in an instructor's course navigation menu, skip step 6b and go directly to step 7. For more information on customizing the Gradescope link for instructors, see step 8 in this section.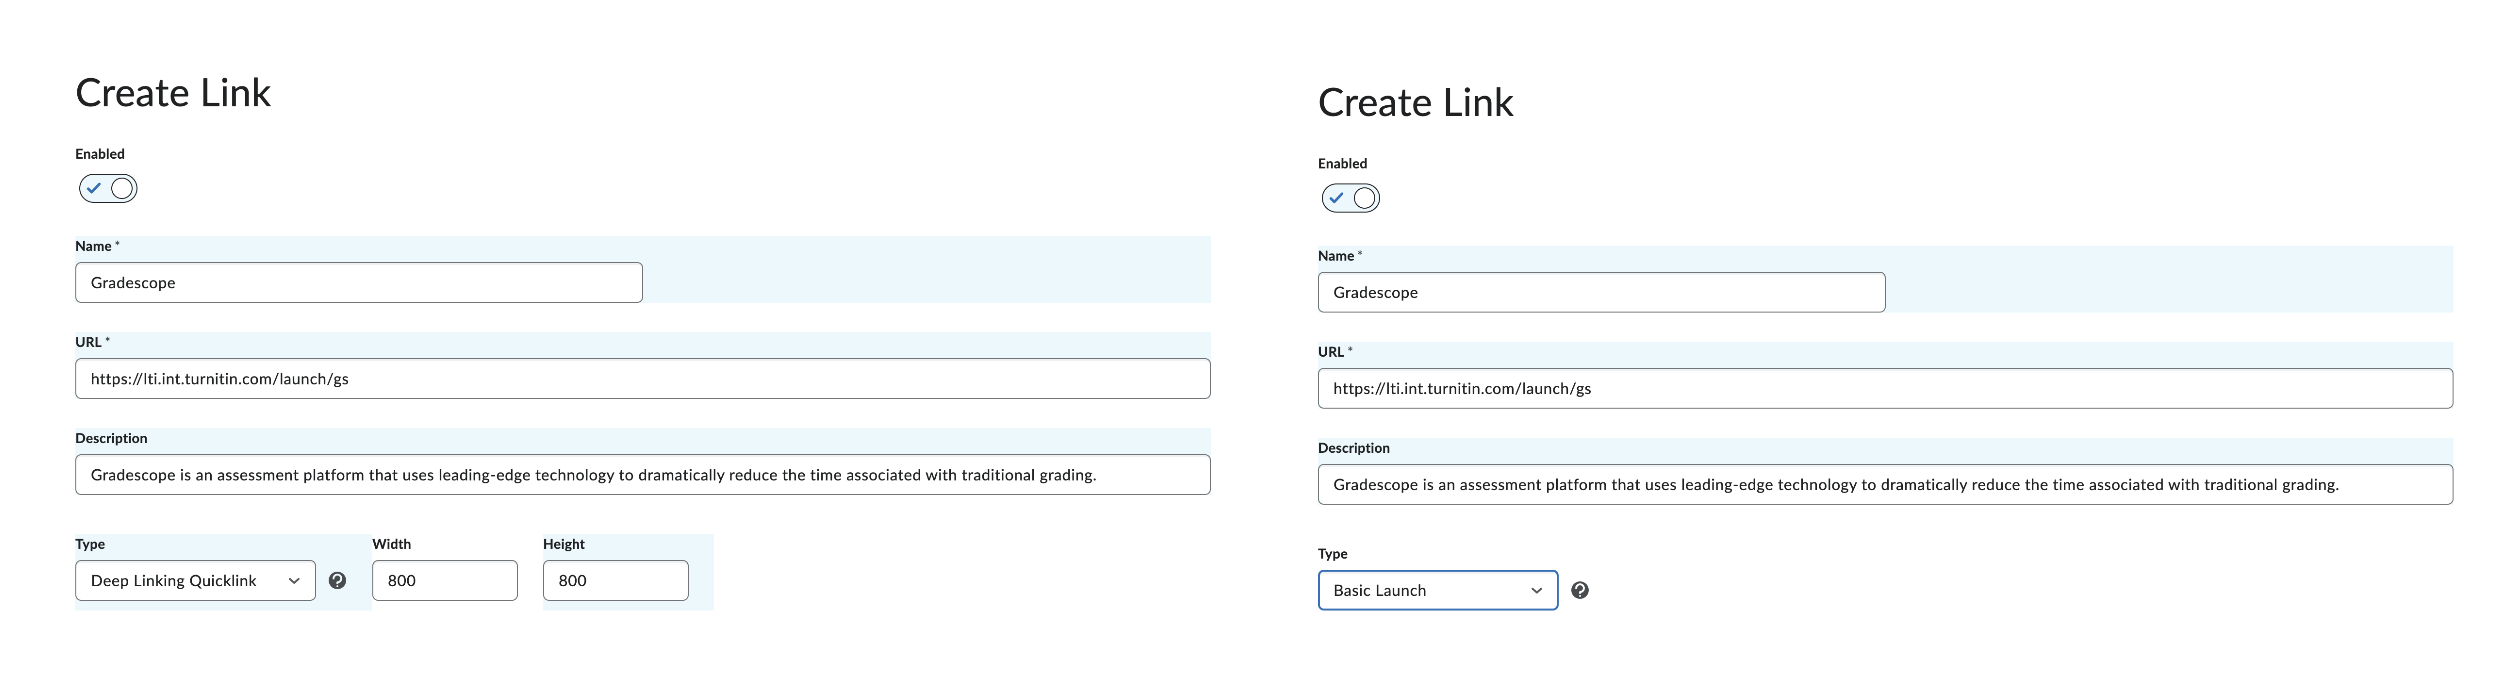
- Select Save and Close. Gradescope will now appear as an option for your instructors.
- Customize the placement of the course-level Gradescope LTI link in the top navigation bar, depending on your institution's preferences.
- Option 1: Display the Gradescope link for all instructors by default - This option enables the Gradescope link to always show for all instructors in their course navigation menu.
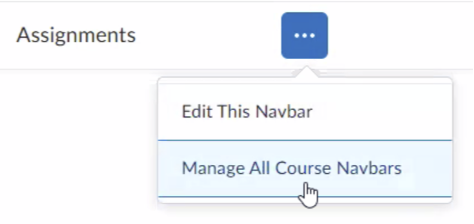
- On the Links page, select Manage All Course Navbars from the dotted menu. This will open the Navbars settings page.
- Select Top-Level Navigation from the Active Navbar list. You can also choose a different navigation bar you have customized.
Make sure the navbar you are choosing is set to Default so that it shows up in the list.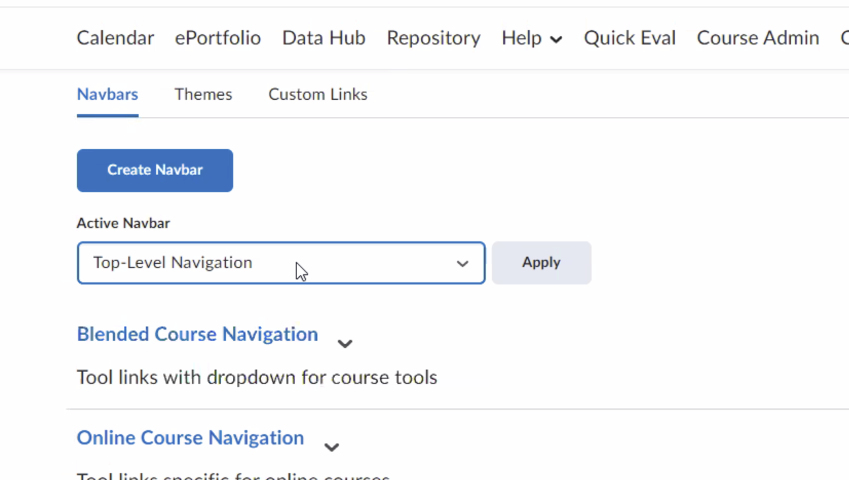
- Scroll down and select the Top-Level Navigation link.
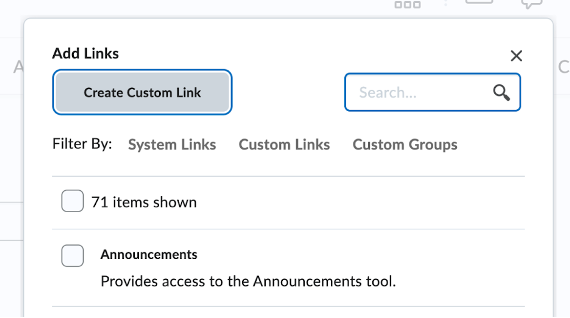
- On the Edit Navbar page, select Add Links from the Links section.

- Select Create Custom Link in the Add Links modal.
- In the Create Custom Link modal:
- Enter a Name.
- For the URL, select Insert Quicklink to open the Insert Quicklink modal.
- Select External Learning Tools and then Gradescope.
- Select Create to close this modal.
- Select Add to close the Add Links modal. Back on the Edit Navbars tab, you should now see Gradescope added (it may appear towards the end of your links list).
- Select Save and Close. You will see a confirmation message that the newly created link was saved.
- On the Links page, select Manage All Course Navbars from the dotted menu. This will open the Navbars settings page.
- Option 2 (Default): Instructor’s choice - This option lets your instructors decide whether or not to display the Gradescope link in their course navigation menu. For this option, no action is required from the administrator, but the instructor will need to complete the steps in Adding Gradescope to the course-level navbar.
- Option 3: Don’t display the Gradescope link at all - This option hides the Gradescope LTI course link from instructors so they won’t be able to add or modify it. For this option, you should skip creating a course-level link in step 6b of this section.
- Option 1: Display the Gradescope link for all instructors by default - This option enables the Gradescope link to always show for all instructors in their course navigation menu.
Step Four - Final deployment
Gradescope is now installed and will be listed within your External Tools. To complete the configuration, we need to link it to your account so that it can be used by instructors and students.
- Access a Brightspace (D2L) course and select the Content tab.
- Select your newly configured Gradescope option from the Add Existing Activities drop-down.
- You may be prompted to log into Gradescope if you are not already. Please ensure you are logging into the account that has had the integration permissions enabled.
- Enter a Branded Platform Name, such as “Brightspace” so your instructors will recognize this as your Brightspace integration within Gradescope.
- Select your school.
- You’re done! Your instructors are now able to link their Brightspace (D2L) courses to Gradescope, sync rosters, create and link assignments, and sync grades between Gradescope and Brightspace.