Table of Contents
Creating an Outline
Creating an Assignment Outline
Creating the assignment outline is the first step for creating the Exam / Quiz or Homework / Problem Set assignments.
- For the Template, upload a blank copy of your assignment to Gradescope in the Create Assignment step. Select Create Assignment.
- The uploaded template displays on the left and the outline on the right for the Create Outline step. Next, you will build the outline.
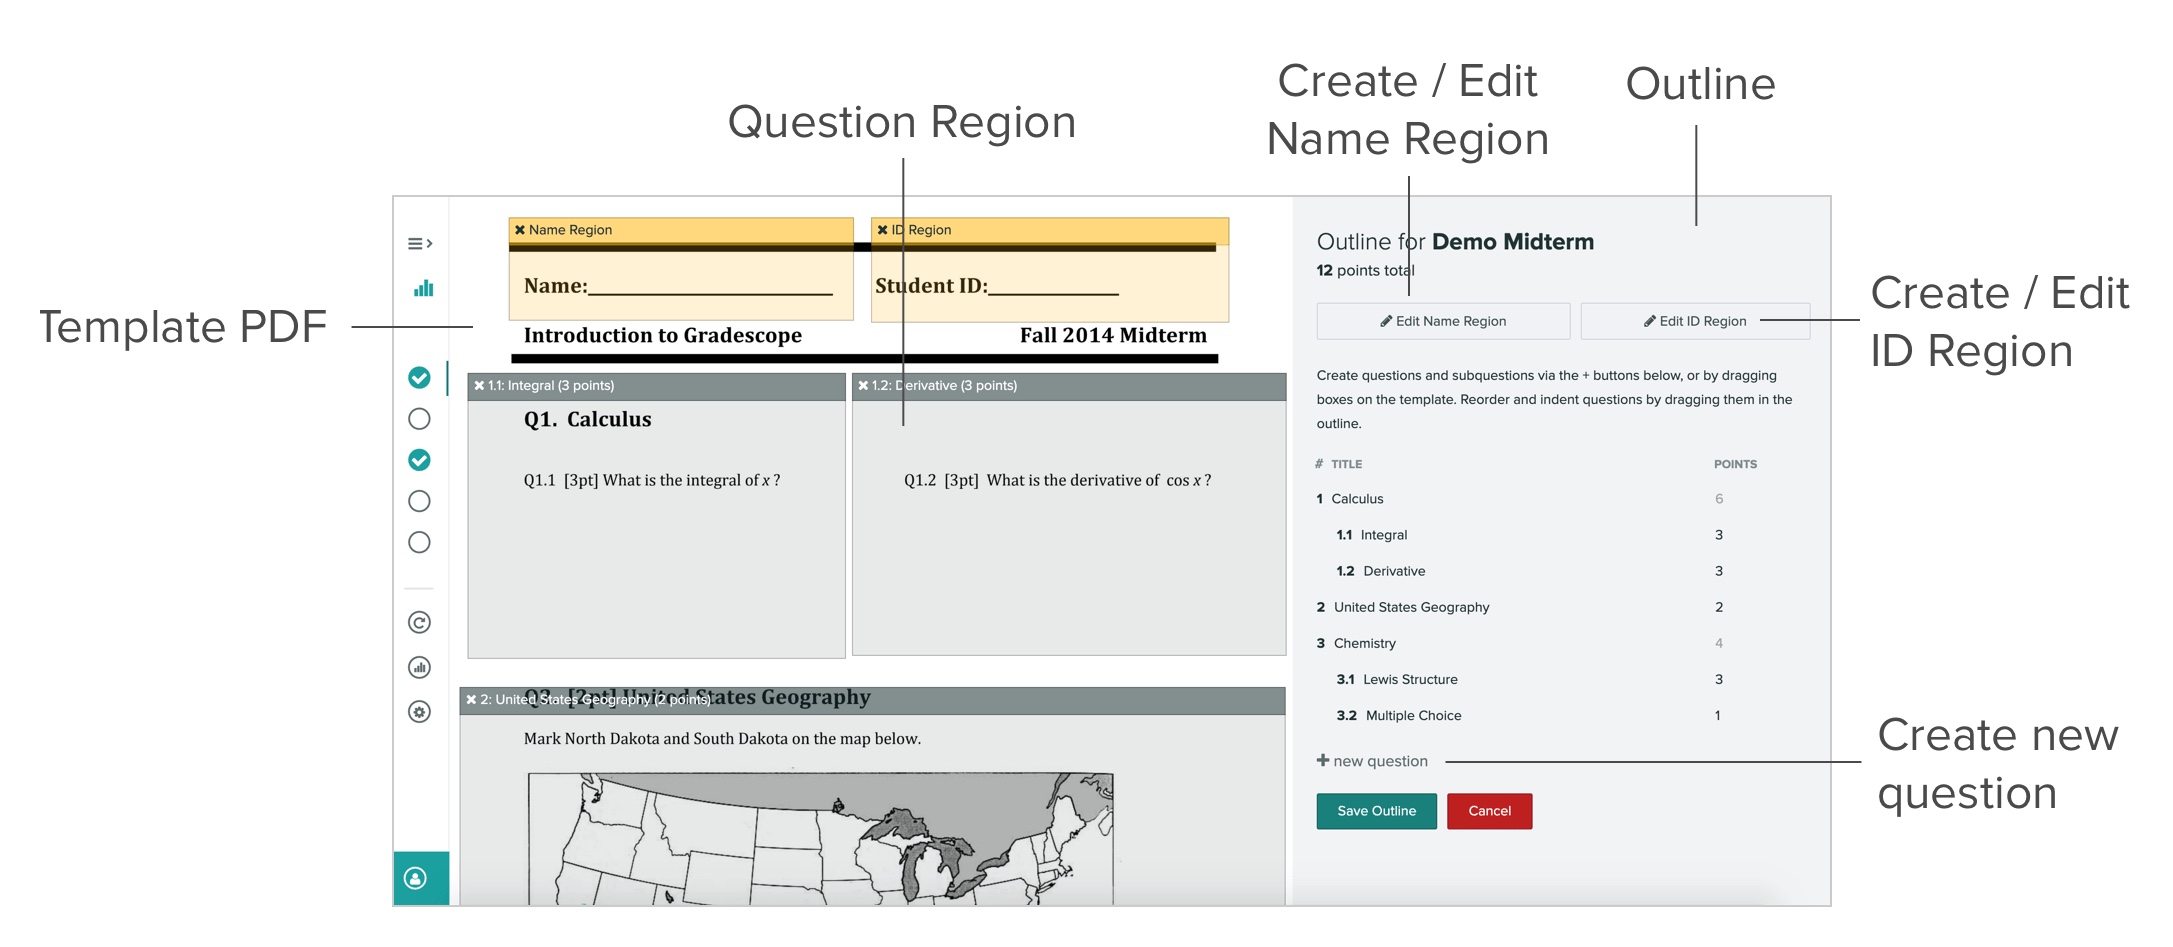
- To add the Name Region and ID Region, use the side panel or draw regions directly on the page:
- In the side panel, select Create Name Region and Create ID Region to add the areas for the student name and ID.
- Make sure the region box covers the area on the page where students will write in their full names or IDs.
It’s helpful to create regions that are slightly larger than the actual area you expect students to use.- To edit a region, select Edit Name Region or Edit ID Region.
- Draw region boxes directly on the template page for the student name and ID areas.
- In the side panel, select Create Name Region and Create ID Region to add the areas for the student name and ID.
- To create a question, use the side panel or draw a region directly on the page:
- In the side panel, select + new question. You can title your questions and add point values. As you add questions to the outline, a total point tally for the assignment appears at the top of the side panel.
You can create subquestions by clicking the teal plus sign icon (to the right of the red “x” delete icon), or by dragging a question into another one. You can also drag a subquestion outward to turn it into a question.
- Draw region boxes directly on the template page for each question and response area. You can drag and resize these regions as needed. For fixed-length assignments, this is necessary to specify the areas where students will write their answers.
When grading an assignment, the viewer will automatically zoom to the region you designated. So, it’s generally helpful to create regions that are slightly larger than the actual area you expect students to use. - To reorder the questions in the side panel, drag any question or subquestion to the place you want it.
- To delete a question, a subquestion, or a group of subquestions, click the red “x” delete icon next to each of these items.
- To replace the template PDF, go to Settings in the left sidebar. Replacing the template will preserve the outline, any region boxes, and any grading you’ve already done for that assignment.
- To create extra credit questions, set the point value for these questions to be 0 on this page. You’ll then be able to disable the score ceiling during grading and award students points above 0 during grading.
- If your outline is for a student-submitted, variable-length assignments, make sure you list all of your questions, subquestions, and assign their point values to complete the outline.
- When your students upload an assignment, they will mark the location of each question on their submissions (see Submitting an Assignment).
- If your outline is for a fixed-length assignment, make sure you set the name region and each question region on your template to complete the outline.
- Select Save Outline.
What are Regions for on the Outline?
A region is where you define an area on the assignment template for Gradescope to look for student identification information as well as the questions and student responses. These specified areas allow Gradescope to assist with auto-matching submissions to students and to detect questions for grading. For example, when you're grading a submission, the viewer will automatically zoom to the regions you designated. The Region boxes can be drawn directly on the template page or added from the side panel. It’s generally helpful to create regions that are slightly larger than the actual area you expect students to use.
Name Region and ID Region
The name and ID region are for specifying where students write in their name and ID on the assignment (the same as it is recorded in the course roster). For instructor-uploaded assignments, creating either a name region or an ID region is necessary for the Manage Submissions step and assigning names to submissions. While having both regions is optional, providing both a name and ID region can help increase the number of students that are automatically matched to submissions. For fixed-length assignments, you need to specify the name and ID regions for students to write in their names and student IDs.
Question Regions
The question regions are for specifying each question and student response area on the assignment. For fixed-length assignments, these regions are required (to specify the areas where students will write their answers). You can create new questions and subquestions by clicking and dragging on the PDF. If you ever replace the template PDF (from the assignment’s Settings page), all of your question regions will be preserved.
Template and Outline tips for Automated Roster Matching
There are some formatting guidelines you can follow when creating the assignment template (PDF) and assignment outline to ensure Gradescope can automatically match the scanned submissions to students on the course roster. These formatting tips are only applicable for instructor-uploaded assignments that will use automated name matching.
When creating the assignment template PDF:
- Tip 1: Whenever possible, include both a student name region and student ID region on the exam as two separate fields, and make sure these individual regions are horizontally aligned. Don’t place the name region on top of the ID region or vice versa.
- Tip 2: Make sure your course roster has Student IDs associated with each student.
- Tip 3: Don’t create an individual region box for each character or number of the student's name or ID, just create one area for the name and one area for the ID.
- Tip 4: For the name region, don’t create separate lines for a student’s first name and last name.
When handing out the assignment to students:
- Tip: Have students write their name and ID on the exam the same way it is recorded in the Student ID column on the Gradescope roster. For example, if the roster includes a first, middle, and last name for the student, they will need to write out their full name on the assignment.
When creating the assignment outline in Gradescope (on the Edit Outline page):
- Tip 1: Make sure the blank copy of the template PDF that you upload is the exact same PDF that is printed and distributed to students.
- Tip 2: Draw the Name region box and ID region box on the Edit Outline page so that they do not overlap.
- Tip 3: Make the name and ID region boxes big enough so that there’s enough space to include student information (for students to write in and for Gradescope’s auto detection).
This ensures that the AI can accurately detect all of the students' handwriting. For example, a letter “g” that partially falls below the box region will be read by our AI as the letter “a”. See the screenshots below for an example of adequate region sizing.
Recommended region size:

Incorrect region size:

Labeled Printouts (Beta)
Currently in beta for instructor-uploaded Homework/Problem Set and Exam/Quiz assignments, the Create Printouts button on the Manage Scans page allows you to generate a single PDF file containing labeled copies of your Template file. You can download and distribute the labeled printouts to give each student a copy of the assignment with a unique label on each page. Students will then complete their work on those labeled pages. When you scan in students’ submissions, Gradescope will use the labels to automatically group the pages of each student’s submission together, no matter the order they were scanned or uploaded in. For step-by-step instructions on this feature, see the Managing Scans help page. To have this feature added to your courses, please contact help@gradescope.com.