Table of Contents
Using Gradescope with Sakai as an Instructor
Getting started
Gradescope integrations with Learning Management Systems (LMSs), such as Sakai, are available with an institutional Gradescope license. When you access Gradescope through Sakai, you and your students won't need to create or use a separate Gradescope password, because you will be authenticated via your Sakai credentials. If you already have a Gradescope account under the email address that's associated with your Sakai account (e.g., your school email), when you access Gradescope in Sakai you will be taken to your existing account. If you do end up with multiple accounts under multiple emails, you can merge accounts.
Below is the general process you should follow to be able to use Gradescope in Sakai. In this guide, you'll find specific details for completing each of these steps and links to other pertinent Gradescope Help Center articles.
- Step 1. Determine your LTI version.
- Step 2. Link your courses.
- Step 3. Sync your roster.
- Step 4. Set up your Gradescope assignment.
- Step 5. Grade submissions.
- Step 6. Post grades.
Determining your LTI tool version
An application programming interface (API) is a type of software that allows two apps to communicate with each other. Learning Tools Interoperability (LTI) is a type of software developed by IMS Global Learning Consortium specifically to allow learning systems, such as Sakai, to communicate with external systems, such as Gradescope. Depending on your institution's configuration, you may be launching Gradescope from Sakai using LTI version 1.3 or using the older version, LTI 1.0 combined with Sakai's custom API. Because the process for using Gradescope with Sakai can differ slightly based on which integration version you have, it's recommended that before you continue on with this page you use one of the methods below to figure out whether your institution is launching Gradescope with LTI 1.0 + API or simply with LTI 1.3.
- Method 1 (recommended): Contact your institution's Sakai administrator or help@gradescope.com to ask if you're using Gradescope in Sakai with LTI 1.0 + API or LTI 1.3.
- Method 2: Check your deep-linking capabilities. To do that, on your course site in Sakai, click Lessons in the left sidebar. If you don't see Lessons in the sidebar, click Site Info > click Manage Tools > Select Lessons. On the Lessons page, click Add Content + > Add Learning App or Add External Tool. If Gradescope is listed under either menu as an app or a tool, you most likely have LTI 1.3. If Gradescope is not listed, you most likely have LTI 1.0 + API. Keep in mind that this is not a foolproof method and the best option is to contact either your admin or help@gradescope.com.
Linking your courses
- In Sakai, navigate to the course site where you will be using Gradescope (Click Sites > Type course name in Filter Sites search bar > Click the course name).
- Click Gradescope in the left sidebar. This will launch Gradescope in Sakai or in a new tab, depending on your settings or your institution's settings (see the note at the end of this section).If Gradescope isn't in the sidebar: Click Site Info > Click Manage Tools > Scroll down and expand the External Tools dropdown > Select Gradescope (or the name of the Gradescope tool at your institution) > Click Continue > Click Finish. Gradescope should now be listed in your left sidebar. If this didn't work, contact your Sakai administrator.
- Once Gradescope launches, you'll see a dialog box with course-linking options. Choose to link to a new or existing Gradescope course, and then click Link Course to go to the Course Settings page.
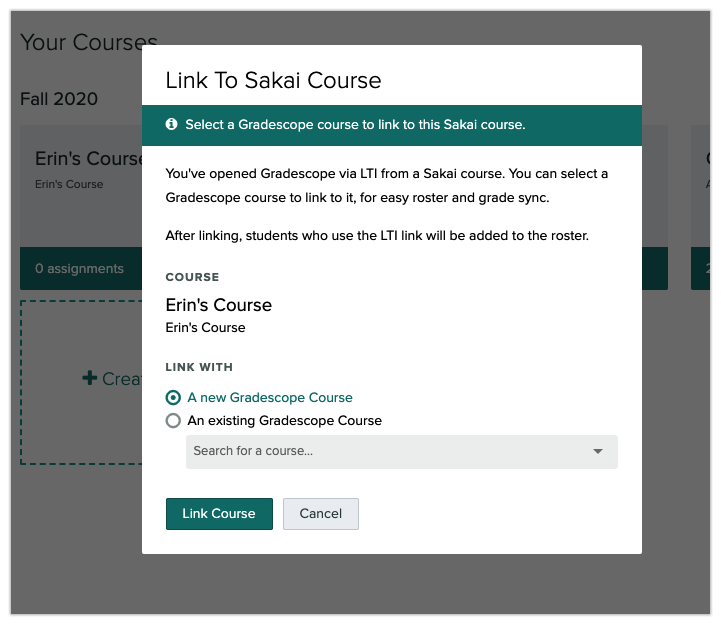 New Gradescope users: At this point, a new Gradescope account will be created for you if you do not already have one associated with the email address (e.g., your school email) that you use in Sakai.
Existing Gradescope users: If you already have a Gradescope account under the email address that's associated with your Sakai account (e.g., your school email), a new Gradescope account will not be created for you, and clicking the Gradescope link in Sakai will take you to your existing account. - On the Gradescope Course Settings page, you can update the course title, description, rubric types, and score bounds. Keep in mind that course title and description changes made here will only appear in Gradescope, not in Sakai.
- When you're finished, click Update Course. Your Sakai and Gradescope courses are now linked. Now, it's recommended that you sync your roster.Embedding or launching Gradescope in a new tab: In your Sakai course, click Gradescope in the left sidebar > Gradescope will launch as an embedded window in Sakai or in a new tab > Click Edit or the pencil icon above the embedded window or back on your open Sakai tab > Select or deselect Launch in popup > Click Update Options. Depending on your selection, Gradescope will now open as an embedded window or in a new tab when you or your students access it in Sakai. If you could not update your launch settings, contact your Sakai administrator.
Syncing your roster
- Navigate to your Gradescope Course Dashboard. If you're continuing from the steps in the section above, you will already be there. If not, click the Gradescope link in the left sidebar of your Sakai course site.
- On your Course Dashboard, click Roster in Gradescope's left sidebar to take you to the Roster page. If the tool window is embedded in Sakai, you may need to expand Gradescope's left sidebar first. On the Gradescope Roster page, click the Sync Sakai Roster button at the bottom of your screen.LTI 1.3 terminology differences: If your institution uses the Gradescope LTI 1.3 tool and uses a different name for Sakai, that customized name could appear on the button instead of the word "Sakai."
- A dialog box will appear explaining how accounts will be synced. All names, student IDs, and emails will be auto-synced from Sakai. All user roles will be synced depending on how your institution initially configured your Gradescope integration. Existing Sakai group names/numbers will be synced as well, but Gradescope will call them "sections." Also, if you're using LTI 1.0 + API, only one section (Sakai group number/name) per person will be displayed on your roster, but you can add or change groups/sections after you sync your roster. See the note after Step 5.
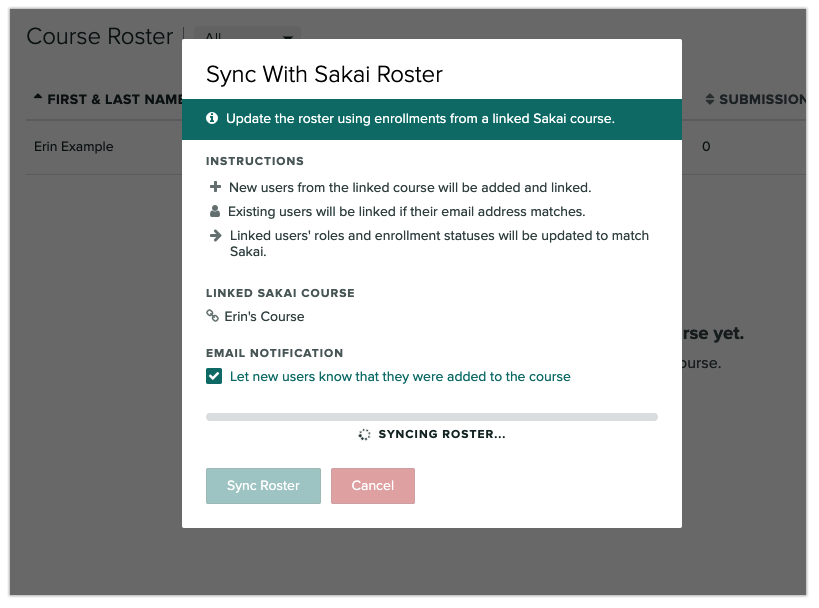
- By default, Gradescope will email users to say that they've been added to the course. If you don't want users to be notified, uncheck "Let new users know that they were added to the course" in the dialog box.
- Click Sync Roster. Sakai may alert you that Gradescope is trying to access your information. If you see this alert, log in (if prompted), click Continue, and then click the Sync Roster button again. If students add/drop in Sakai, be sure to re-sync the roster. Existing submissions/grades for dropped students will be preserved. See the Adding Students and Staff article for more tips.To change or add group names: After syncing, click Download Roster (bottom of Gradescope Roster page) > Add a new column of group values or update existing group values on the CSV file > Click Add Students or Staff+ > Upload the CSV back to Gradescope. Sakai linking and any existing submissions and grades will be preserved as long as emails stay the same. Please note that if you re-sync your roster, you will lose any group names you previously added or changed.
Setting up your assignments
Setting up your Gradescope assignment is slightly different depending on whether you're using LTI 1.0 + API or LTI 1.3 in Sakai. Click the appropriate tab below to see how to complete this part of the process based on which LTI version you're using.
- Navigate to your Course Dashboard in Gradescope. To do that, go to your course site in Sakai, and then click Gradescope in the left sidebar.
- On your Gradescope Course Dashboard, click an existing Gradescope assignment or click Create Assignment to make a new one.
- If you're updating an existing assignment, click Settings in the left sidebar, make your changes, and then click Save. If you're creating a new assignment, next choose the assignment type and settings. See our Help Center article on creating an assignment for details on assignments and settings. When you've chosen your settings, click Create Assignment.
- Your assignment is now updated/created. For student-uploaded assignments, once your release date passes in Gradescope, students will be able to submit work when they access Gradescope via the link in their left sidebar in Sakai.
- On your course site in Sakai, click Lessons in the left sidebar. If you don't see Lessons in the sidebar, click Site Info > click Manage Tools > Select Lessons.
- Once you're on the Lessons page, click Add Content +. A dialog box will appear. In the dialog box, click Add Learning App, and select the Gradescope link. Please note that there are a variety of ways to link assignments. If you do not see the Add Learning App link, ask your institution how they would like you to create links to Gradescope assignments in Sakai.
- At this point, depending on your institution's configuration, you may be taken straight into Gradescope. However, if prompted, click Launch External Tool Configuration to open Gradescope. When Gradescope launches, you will see a dialog box about assignment-linking. Decide whether you'd like to create a new Gradescope assignment or link to an existing one. Then, click the Link Assignment button.
- If you're creating a new Gradescope assignment, next choose the assignment type and settings. See our Help Center article on creating an assignment for details on assignments and settings. When you've chosen your settings, click Create Assignment. This will take you back to your Sakai Lessons page where you and your students will see a link to the assignment.
- On your Lessons page in Sakai, click the assignment link you just created to go back to Gradescope and add or edit your assignment outline or questions. Save your work in Gradescope when you're finished.
- For student-uploaded assignments, once your release date passes in Gradescope, students will be able to submit work when they access Gradescope via the direct assignment link you created or via the Gradescope link in the left sidebar of their Sakai course site.
Grading submissions
- Launch the Gradescope assignment you'd like to grade. To do that, log in to Sakai, click your course, and then click Gradescope in the left sidebar. Once Gradescope launches, click your assignment. Alternatively, if you're using LTI 1.3 and you created a direct assignment link on your Lessons page in Sakai, click that link to be taken directly to the assignment in Gradescope.
- When your assignment is open, expand Gradescope's left sidebar (if it isn't already), and click Grade Submissions to start grading.
- Once you do that, the process for grading is the same for Sakai and non-Sakai Gradescope users, so check out the detailed article on Grading Submissions.

Posting grades
- First, make sure you've already synced your roster. Next, make sure you see Gradebook listed in the left sidebar of your Sakai course. If you don't see Gradebook in the sidebar, click Site Info > click Manage Tools > Select Gradebook.
- Then, the steps in this part of the process will be different depending on whether you're using LTI 1.0 + API or LTI 1.3. Click the appropriate tab below to see how to complete this part of the process based on which LTI version you're using.
 To enlarge/restart the gif: Right-click on it. Then select Open Image in New Tab.
- As an LTI 1.0 + API user, first you will need to create a Sakai gradebook item from Gradescope. To do that, launch your Gradescope Course Dashboard by clicking the Gradescope link in the left sidebar of your Sakai course.
- Once Gradescope launches, click the Gradescope assignment you'd like to link to Sakai, expand Gradescope's left sidebar (if it isn't already), and click Settings.
- Scroll down to the Sakai Gradebook Item section and click Link. When the dialog box appears, click Create New Gradebook Item or select the name of an existing Sakai gradebook item from the dropdown. With LTI 1.0 + API, only Sakai gradebook items that you created from Gradescope will appear in the list. Scroll down and click Save when you're finished.
- With your assignment open, expand Gradescope's left sidebar (if it isn't already) and click Review Grades. On the Review Grades page in Gradescope, click the Post Grades to Sakai button. When the dialog box appears, click Post Grades. Posting grades to Sakai will only post the students' final assignment scores from Gradescope to the linked gradebook item in Sakai. Only grades for fully graded submissions (which have a highlighted, teal checkmark in the Graded column on the Review Grades page) will be posted.
- Launch your assignment in Gradescope from the Lessons page on your Sakai course site. If you don't see Lessons in your Sakai course sidebar or you don't see the assignment link you need on the Sakai course Lessons page, follow the steps for LTI 1.3 users in the section above on Setting up your assignment.
- Once your assignment is open, expand Gradescope's left sidebar (if it isn't already) and click Review Grades. On the Review Grades page in Gradescope, scroll down and click Post Grades to Sakai. Keep in mind that if your institution uses a different name for Sakai, that customized name could appear on the button instead of "Sakai."
- When the dialog box appears, click Post Grades. These grades will now appear in your gradebook in Sakai.
If you don't see a Post Grades button: Go to your Sakai Lessons page. Click your Gradescope assignment link there to launch it. Click Review Grades (left sidebar in Gradescope). The Post Grades button should be in the footer of the Review Grades page now. If that didn't work, contact help@gradescope.com. - Next, regardless of your LTI version, if you want students to also see their graded, annotated submissions, question-by-question scores, rubrics, and feedback on Gradescope, click the Publish Grades button. If you'd like to, click the Compose Email to Students button at the bottom of the Review Grades page in Gradescope to alert students via email that their grades are now visible. To see what your students will see when they view their grades, check out the Using Gradescope with Sakai as a Student article.
Troubleshooting
Roster-syncing issues
Issue | Solutions |
I'm a TA and I don't see the sync roster button. | If you're using LTI 1.0 + API, only Gradescope instructors can sync with the Sakai roster.
|
I'm a TA and I can't sync the roster at all. | Contact an instructor in your course. Ask them to add the "View participant's email" permission to your role on the course's Roster page in Sakai. You can direct them to the steps in the row below if they don't know how to do that. |
I'm an instructor. I can't sync the roster and/or my colleague can't sync the roster at all. |
|
As an instructor or TA, I can only sync part of my roster. | If some members of your course can’t be synced along with the rest of your roster, most likely, these members do not have an email address associated with their account in Sakai. To fix the issue, either ask the course members or your Sakai admin to add the email addresses to the accounts in Sakai. Then re-sync the roster. |
After I unlink a Sakai course from Gradescope, the initially synced roster will remain on the Roster page even after I link a new course. | Please contact help@gradescope.com to have the excess students removed. Alternatively, if there are no assignments within the course, you can delete it and create a new one to link with Gradescope. |
Grade-posting issues
Issue | Solution |
I am a TA and can't post grades from Gradescope to Sakai. | Ask an instructor in your course to change your role to "instructor" on the Gradescope course roster page. If that doesn't work, try the steps listed in the section about Roster-syncing issues. Grade-posting and roster-syncing problems are often related. |
I am an instructor and can't post grades from Gradescope to Sakai. | Re-sync the roster in Gradescope. Then click Post Grades again. |
In my Sakai gradebook, I can't edit grades that I posted from Gradescope. | To post Gradescope grades to Sakai as an LTI 1.0 + API user, you have to create a Sakai gradebook item from Gradescope, and it is not possible to directly edit one of these gradebook columns in Sakai. Similarly, even if you are an LTI 1.3 user, certain versions of Sakai will not allow you to edit grades posted from Gradescope even if you created the gradebook item in Sakai. If you need to edit Gradescope grades in a locked Sakai gradebook column, try the workarounds below.
|
I posted grades from Gradescope to Sakai. In my Sakai gradebook, I can't give zeros to students who didn't submit this assignment. | To post Gradescope grades to Sakai as an LTI 1.0 + API user, you have to create a Sakai gradebook item from Gradescope. When you post grades to a Sakai gradebook item that you created from Gradescope, students who did not submit work will have no grade listed and the gradebook column you created in Gradescope will be locked (not editable) in Sakai. Similarly, even if you are an LTI 1.3 user, certain versions of Sakai will not allow you to edit grades posted from Gradescope even if you created the gradebook item in Sakai. If you need to give zeros in a locked Sakai gradebook column, try the workarounds below.
|
In my Sakai gradebook, I can't delete a column containing grades that I posted from Gradescope. | To post Gradescope grades to Sakai as an LTI 1.0 + API user, you have to create a Sakai gradebook item from Gradescope, but there is no way to delete Sakai gradebook items that were created from Gradescope. Similarly, even if you are an LTI 1.3 user, certain versions of Sakai will not allow you to edit grades posted from Gradescope even if you created the gradebook item in Sakai. However, you can hide an unwanted gradebook item column and not include it in the course grade total. Follow the steps below to learn how.
|
I can't post scores that are greater than the max. point value from Gradescope to Sakai (i.e. 12/10 points). | Unfortunately, certain versions of Sakai do not allow you to post a score from Gradescope to Sakai that exceeds the max point value. Any grade you post that does exceed the max point value will be reset to the max point value. There are a couple of workarounds through.
|
Embedded window issues
Issues | Solutions |
Gradescope doesn’t appear in the embedded window when I use the Safari browser | To use Gradescope in an embedded window within Sakai, select Preferences from Safari’s settings and then ensure Prevent cross-site tracking is unchecked. |
Gradescope doesn’t appear in the embedded window when I use Chrome in incognito mode | Third-party cookies may be blocked which will prevent this functionality. To temporarily enable third party cookies, select the eye icon on the right of the URL address bar when you attempt to launch Gradescope LTI. A modal will appear where you can select "Site not working?" and then Allow cookies. This setting will reset when you restart your browser. To permanently allow third-party cookies, go to https://support.google.com/chrome/answer/95647. Select Privacy and security and then Cookies and other site data. Here you will be able to Allow all cookies. This setting will remain unless you return to the settings and disable it. |